• We're currently having issues with our e-mail system. Anything requiring e-mail validation (2FA, forgotten passwords, etc.) requires to be changed manually at the moment. Please reach out via the Contact Us form if you require any assistance.

Tutorial How to create a metal guitar-tone using free plugins by Ignite Amps.

inactive

Passionate Fan
Jun 27, 2019
179
ignite_amps_logo.png

Ignite Amps was founded in 2006 by Frederico Berti and Carlo Costabile, two Italian metalheads who design and build custom guitar amplifiers and pedals. Costabile is responsible for building the physical products while Berti is responsible for coding the mathematically-modelled prototype simulations. Their combined skills give them an excellent understanding of both practical and virtual electronics.

Several simulations of their hardware products have been released as free plugins, which can be downloaded from the Ignite Amps website:

You may already own multiple guitar-focused plugins, however, Ignite simulations are well made and you may prefer their sound over your existing plugins. These things are subjective, of course, but you can always try Ignite plugins without harming your wallet.
 
  • Like
Reactions: mobius017

inactive

Passionate Fan
Jun 27, 2019
179
Step 1: Choosing an electric guitar or virtual electric guitar.

If using a real guitar, you will need to record its output as a DI (direct input) signal. This can be done with the help of a DI box. Search online to find one that suits your needs and/or budget.

If using a virtual guitar, please ensure that it was sampled using a DI signal.

Because Ignite Amps are designed primarily for high-gain (distorted) timbres, it is best to use a guitar that is equipped with a humbucker pickup. Likewise, if using a virtual guitar, it is best to use a VST that was sampled from a guitar that uses a humbucker pickup.

Traditional single-coil pickups are certainly usable, but they not ideal for two reasons:
  1. Single coils are bright and noisy, which means they output frequency-rich signals. Unfortunately, high-gain distortion works by adding frequency information to an incoming signal, and if a frequency-rich signal is passed through a high-gain amplifier, the resulting audio may be unpleasant. In comparison, humbuckers output a slightly dark, yet cleaner signal that is more suitable for distortion.
  2. Single coils produce weak signals, which means amplifiers must work harder when generating high-gain distortion. In comparison, humbuckers produce stronger signals, which means amplifiers can generate high-gain distortion with less effort. The harder an amplifier has to work, the more difficult it is to control guitar tone, and vice versa.

If you wish to move beyond traditional single-coil and humbucker pickups, battery-powered active pickups are a good option. These generate even cleaner signals, making them very suitable for heavily-distorted guitar tones. Please note that some guitars have more than one type of pickup.
 

inactive

Passionate Fan
Jun 27, 2019
179
Step 2: Tube Screamer!

For the purposes of this tutorial, the first effect in your guitar effects chain will be a tube screamer.

Tube Screamers are a series of guitar pedals engineered and sold by Ibanez beginning in the late 1970s. Because of their continued popularity, the terms “tube screamer” and “screamer” have become generic names for countless similar products. Although tube screamers are ostensibly designed to create overdrive distortion, most metal guitarists prize them for their ability to shape a guitar’s tone. Screamers do this by emphasizing mid-range frequencies, which alters the guitar signal in manner that is suitable for high-gain distortion.

Two screamer plugins are available free from the Ignite Amps website. Please download the TSB-1 Tyrant Screamer.
  • Place the TSB-1 into the first slot of your guitar signal chain.
  • Rotate the “DRIVE” knob all the way left, thereby turning off the overdrive distortion.
  • Leave all other knobs at 12 o’clock (for now).
tsb-1_top.png

Just like the real hardware, the TSB-1 pedal (pictured above) can be activated/deactivated by clicking the white footswitch at the bottom left of the plugin. When the pedal is active, a whitish-blue LED illuminates.

It possible to view the underside of the TSB-1 (pictured below) by clicking the downward-pointing double chevrons at the bottom middle of the plugin. Several more options can be found on the underside, including the very important INPUT LEVEL slider.

tsb-1_bottom.png

When recording a guitar with your computer, it is normal to set the recording levels to something that will not clip, yet not be too quiet. However, different guitar pickups have different output levels. For example, a single-coil pickup generates a weaker signal than a humbucker pickup, and a passive humbucker pickup generates a weaker signal than an active humbucker pickup. Although a single coil recorded with 6 dB of headroom will sound just as loud as a humbucker recorded with 6 dB of headroom, such a recording is not representative of the guitar’s actual output level. Ignite plugins simulate real hardware, but instead of inputting a voltage signal into the plugin, you are inputting PCM data; and if your PCM data does not accurately represent the true signal levels of your guitar, the simulation will not be accurate.

The INPUT LEVEL slider exists to compensate for the above discrepancies. The guidelines provided by Ignite Amps state that single coils recorded at good levels should have the INPUT LEVEL set to 0.5×, humbucker signals should be set at 1.0× (default), and active pickups can go as high as 1.5×. Essentially you are reducing or increasing the loudness of the signal to inversely compensate for any increase or reduction in loudness that may have occurred when recording your guitar at ideal levels.

Virtual guitars are a bit trickier, but leaving the INPUT LEVEL at 1.0× should be adequate in most cases.

Unfortunately, Ignite Amps does not include a level indicator on their pedal plugins.

Please note that all Ignite plugins feature an input-level control. However, this only needs to be set on the first plugin in your effects chain. Anything that follows can by left at the default 1.0× setting without issue. Furthermore, if you disable the TSB-1 Tyrant Screamer by clicking its virtual footswitch, the INPUT LEVEL setting will remain active, so no worries. (Warning: bypassing a plugin from within your DAW will deactivate the INPUT LEVEL settings.)

Finally, an S - M switch can be found on the front of the TSB-1 plugin. This selects between two routing modes: stereo and mono. If playing back a double-tracked guitar stem, with each track hard-panned left and right respectively (a common recording technique), then please select stereo routing. However, if recording a live guitar or a playing back a single-tracked guitar stem, you’ll probably want mono routing.

Note: If using Windows, all knobs can be reset to their default positions by holding down the Ctrl key while left-clicking.
 
Last edited:

inactive

Passionate Fan
Jun 27, 2019
179
Step three: The Emissary amp sim.

The Ignite Amps website offers three different guitar amplifier simulations (amp sims) for download. In this tutorial we will focus on the Emissary, which must be downloaded from the STL Tones website.

Insert the Emissary (pictured below) into your guitar effects chain immediately after the TSB-1 Tyrant Screamer.

emissary_front.png

Near the left side of the plugin’s control panel is a CHANNEL toggle switch. This is used to swap between the CLEAN channel (white LED) or the LEAD channel (red LED). Select the LEAD channel for this tutorial.

Please leave other options in their default positions; they will be discussed later.

Just like the TSB-1 Tyrant Screamer, the Emissary offers two routing modes: mono and stereo (bottom right). Please set this to match your TSB-1 setting. If the TSB-1 is set to stereo but the Emissary is set to mono, you will only get a mono signal. Conversely, if the TSB-1 is set to mono but the Emissary is set to stereo, your CPU is doing unnecessary work.
 
Last edited:

inactive

Passionate Fan
Jun 27, 2019
179
Step five: Guitar cabinets and NadIR.

Perhaps the most important element that defines a good guitar tone is the guitar cabinet itself. In order to simulate this, Ignite Amps has developed NadIR, a free plugin that must be downloaded via the STL Tones website. (It comes bundled with the Emissary plugin linked above.)

nadir.png

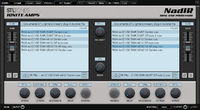
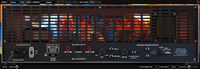
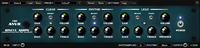
NadIR (pictured above) is a guitar-cabinet impulse response (IR) convolver plugin.

A guitar-cabinet IR is a small sound file created by inputting a sine sweep into a real guitar cabinet, recording the sine sweep with a microphone as it exits the cabinet speakers, and then digitally processing the results to create the final IR.

Convolvers plugins are tools that employ algorithms to modify an input signal with any selected IR. They are often used as reverb tools, but other uses are also possible. Common examples of convolvers include Fruity Convolver in FL Studio, REVerence in Cubase, and ReaVerb in Reaper. However, unlike the above, NadIR is designed specifically for use with guitar-cabinet IRs. (You can use it in other ways if you’re feeling adventurous, but that’s outside the realm of this tutorial.)

Countless free and commercial guitar-cabinet IRs can be found on the internet, each with slightly different qualities.

Things to look for in an IR are:
  • What type of speaker cabinet?
  • What type of speaker?
  • What type of microphone?
  • How was the microphone positioned?

The above list is ordered from least effect on guitar tone (speaker cabinet) to the greatest effect on guitar tone (microphone positioning).

NadIR comes bundled with a handful of guitar cabinet IRs, and their filenames describe how they were captured. For example, the filename RKH 4x12 V30 SHR SM57 Center.wav describes the following:

RKH 4x12 = Randall Kirk Hammet guitar cabinet w/ four twelve-inch speakers
V30 = Celestion Vintage 30 speakers
SHR SM57 = Shure SM-57 microphone
Center = microphone placed perpendicular to speaker cap

Similarly, the filename RKH 4x12 V30 SNH MD421W 45 deg.wav describes this:

RKH 4x12 = Randall Kirk Hammet guitar cabinet w/ four twelve-inch speakers
V30 = Celestion Vintage 30 speakers
SNH MD421W = Sennheiser MD-421W microphone
45 deg = microphone placed at 45° to the speaker cone

A common method for recording guitar cabinets is to use two different microphones with two different placements. The idea is to capture a “bright” timbre and a “dark” timbre, and then blend the two together. In order to accomplish this, NadIR allows you to load two IRs simultaneously—one in the left side and one in the right side. Once you have loaded a bright-sounding IR in one side and a dark-sounding IR in the opposite side, use the BALANCE knob to adjust according to taste.

Unlike the TSB-1 Tyrant Screamer and the Emissary, NadIR has three routing modes: mono, dual mono, and stereo. Mono mode uses both IRs and blends them according to settings. Stereo mode uses the left IR for the left channel and the right IR for the right channel, with the balance knob behaving more like a pan knob. Finally, dual-mono mode is also stereo, but both the left IR and right IR are blended according to settings and then the result is used identically for both left and right channels.

NadIR also features analog-modeled HI PASS and LO PASS filters. Unfortunately, EQing for guitars is a big topic, so I won’t go into detail here. As a general rule, however, high-pass filters are used to get rid of flubby, low-pitched rumbles; and low-pass filters are used to get rid of the upper-frequency “fizz” created by high-gain amplification.

You might be surprised at how low you can cut high-gain guitars, especially when using NadIR’s analog-modeled filters. Even setting the LO PASS filter at 6.0 KHz can sound good for heavily distorted guitars. This is partly because speakers used for metal guitar have a noticeable response drop-off at 7KHz, and frequencies above that tend to be a bit wibbly-wobbly. The frequency chart in the link below show this phenomenon as it relates to the Celestion Vintage 30 speakers:

The remaining features in NadIR are for detailed tweaking and won’t be covered in this tutorial. If you’re interested in their functions, please see the pdf manual that is included with the NadIR plugin.

IMPORTANT: Because IRs will have the most impact on your tone, please keep trying different IRs and IR combinations until you are satisfied. This make take some time at first, but you will eventually build your own small collection of go-to IRs.

ADDENDUM: For more information on how to make cabinet IRs sound more realistic, please see my Guitar Cabinet Impulse Responses vs. Realism thread.
 
Last edited:

inactive

Passionate Fan
Jun 27, 2019
179
Step six: Fine tuning your tone.

Once a suitable IR or IR combination has been selected, you can return to the Emissary plugin and start “dialing in” your guitar tone. This is best done while listening to your entire mix—what sounds good in solo will not necessarily sound good in context.

To begin with, try playing with the switches and knobs in the LEAD section. Further adjustment can be made with the DEPTH and PRESENCE knobs as well as the LEAD MASTER volume knob, all of which can be found to immediately right of the LEAD section. There are no hard rules when it comes to dialing in a tone, other than “Does it sound good in my mix?”

However, there are two things to consider:
  1. Emissary’s LEAD channel is very high-gain, so you don’t need to crank it all the way to the right.
  2. Guitars are mid-frequency instruments, and because of this the LO MIDS and HI MIDS knobs will have the greatest impact on your tone. Lowering the mids, often referred to as “scooping the mids,” will cause you guitar tone to disappear into the background of a full mix; while boosting the mids will lift your guitar tone front-and-center.

In regard to the TSB-1 Tyrant Screamer, it is common to leave DRIVE all the way left (off) when using high-gain distortion. However, it is also possible to reduce the gain on your amp sim and boost the tube screamer’s DRIVE slightly to get a different distortion tone. LEVEL should be at 12 o’clock or greater. In fact, you regularly see metal guitarist use a tube screamer with the LEVEL (or equivalent knob) turned all the way right and the DRIVE (or equivalent knob) turned all the way left. Finally, try turning the TONE knob slightly left or slightly right to adjust your tone—extreme adjustments are not needed.
 

inactive

Passionate Fan
Jun 27, 2019
179
Other options:

emissary_back.png

If you’re interested, feel free to play with Emissary’s clean channel. Or you can click the arrow in the lower-left corner of the plugin and see its back panel (pictured above). Here you can change the tube type and/or the voltage biasing. For more information, please read the pdf manual included with Emissary.

The TSB-1 Tyrant Screamer has a BOOST footswitch and a SWEEP knob not found on standard tube screamer pedals. Try them for yourself and see (hear) if you like the results. And once again, if you want more information, please read the pdf manual that came with your download.
 

inactive

Passionate Fan
Jun 27, 2019
179
Other free downloads from Ignite Amps:

nrr-1.png

the_anvil.png

Ignite Amps offers two additional guitar amp sims: NRR-1 and The Anvil (both pictured above). However, these two are pre-amplifiers (pre-amps) only. If one were to use the actual hardware versions of either the NRR-1 or The Anvil, their output signal would not be strong enough to drive a guitar-cabinet at great volume. In order to boost the signal for stage use, they need to be paired with a power amplifier (PA).

tpa-1.png

When using the either the NRR-1 or The Anvil plugins, one should pair them with the TPA-1 plugin (pictured above), a PA simulator that is also freely available from the Ignite Amps website. This plugin should be placed after your choice of pre-amp in your effects chain and before NadIR. However, because the NRR-1 and The Anvil are only simulations, and because their output is PCM data rather than an electrical signal, you can use them without the TPA-1 at the expense of simulation accuracy.

Do not pair the TPA-1 with the Emissary amp sim; it’s not necessary and not recommended.

Unlike the Emissary, both the NRR-1 and The Anvil offer three channels: CLEAN, RHYTHM, and LEAD. The primary difference is the amount of high-gain distortion that each channel offers, with LEAD having the most and CLEAN having the least.

shb-1.png

If you want to simulate a bass amplifier, Ignite Amps offers the SHB-1 plugin (pictured above). This bass amp sim works as a standalone plugin—a separate PA plugin or a separate pre-amp plugin is not needed. NadIR should be placed after the SHB-1 in your effects chain. Unfortunately, bass cabinet IRs are hard to find.

ts-999.png

The TS-999 SubScreamer (pictured above) is another tube screamer pedal that can be used in place of the TSB-1 Tyrant Screamer. Although the basic operations are the same, it has some different additional features.

profet.png

The ProF.E.T. (pictured above) is a distortion pedal that is designed to be used on a clean channel.

pteq-x.png

Finally, Ignites Amps offers an EQ plugin called PTEq-X (pictured above), which simulates three of the famous Pultec EQ modules. Although multiple companies offer commercial plugins based upon the Pultec EQs, you’ll find the free Ignite Amps version to be more than adequate. For details on the Pultec EQs, do a quick Google search and you’ll find mountains of information.

That's all folks!
 

Users Who Are Viewing This Thread (Users: 0, Guests: 1)