(This is basically a repost of the thread I did in UTAForum actually, so I added here just to have a more widespread availability for the thread I guess...)
Hey guys, HoodyP here!
Recently, on 24th of December 2021, Haruqa (creator of TALQu) initiated the "Lightning Project Challenge" where the goal of the challenge was for people to create a TALQu model within a week. The point of the challenge, according to Haruqa, was to in fact, "reach a further audience and spark more creator's interest with TALQu content creation". In doing so, they released both the official Haruqa Corpus and the official TALQu voice model creation Colab notebook. You can check the post here (【ライトニング企画】1週間でTALQuモデル作成チャレンジできるかな【終了】|Haruqa|pixivFANBOX). Sadly enough the challenge ended by the end of 2021, but Haruqa stated in their re-tweet, responding to a person who was sad that they weren't able to finish the model in time for the challenge, that Haruqa is planning to, most likely indefinitely, make the Lightning Project's notes post (the one linked earlier) publicly even after the challenge, by extension, leaving both the corpus list and the Colab notebook public for future creators to make their own TALQu models! So this is great news! In turn, I'll be making an English guide on TALQu and how you can create a "lite" version model yourself!
First of, let's start of with the fundamentals!
1. Introduction to TALQu
1.a What is "TALQu"?
TALQu is a freemium Japanese AI text-to-speech software created by Haruqa (or by association, Haruqa Software, Haruqaのソフトウェア), an indie code writer/programmer, and also apparently a Vtuber! TALQu uses a modified variant of Tacotron 2 + HiFi-Gan (an open-source neural network based text-to-speech engine) as it's base engine, and it has both a free version and a PRO version. It has recently gotten popular in the Japanese vocal-synth community that even well known UTAU/SynthV voice creators such as Canon (Ritsu), VirVox Project (SynthV Genbu), Yuuma (Shiki Rowen, aka Kemonone Rou), Kirika (Female Ruko) and even recently, Twindrill (Kasane Teto), have all made TALQu voice models based on their established characters!
The free version of TALQu can be downloaded here:
 booth.pm
However by contributing about 4-5USD per month to Haruqa's Fanbox, Haruqa|pixivFANBOX (which is essentially like Haruqa's Patreon), you can get the latest PRO version of TALQu!
1.b Difference between the "Free" and "PRO" version of TALQu
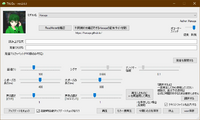
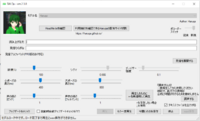
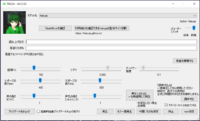
Free version (shown in the picture above)
- Have the ability to switch between the normal Tacotron 2 synthesizer, and/or the smooth HiFi-Gan vocoder synthesizer (top left slider).
- Ability to tune and edit the tone of the voice output by drawing on it (clicking on the "調声する" button).
- Sliding up and down the pitch of the voice output ("ピッチ" slider) or the gender of the voice output ("フォルマント" slider).
- Using the other slider functions to get the desired results.
-Using capital letters "X, Y and Z" at the start of the word, and also "?" and "!" at the end of the word to do varied expressions (if the voice models has any).
- Check and automatically update TALQu to the latest version by clicking the "アップデートをチェック" button.
PRO version (Haruqa's Fanbox exclusive)
It has all of the functions of the free version, in addition with:
- Editing the input text's generated alphabetic phonemes (third input text box, similar to the phoneme edit function in SynthV).
- Have a function to use a "High Frequency General Purpose Hifi-Gan vocoder" to any of the selected models (even to the voice models that doesn't have a HiFi-Gan smoothing vocoder function).
- Ability to switch between different voice model types for a single voicer (if they had any).
1.c TALQu's Term's of Service (properly explained in English, taken from it's Booth site)
By using TALQu and it's created models, you must comply with the following TOS:
i) Prohibited Acts:
- You must not use the program for use in criminal activity, mischief (such as pranking, troll, etc), and malicious intent (such as harassment, spark political debate/ideas, spread negativity of an individual/group, etc).
- Redistribution of the software, no matter if it's the free or the PRO version, is NOT permitted. If you wanted to share TALQu's download, just link to either the official Booth website (TALQu 深層学習系読み上げソフト フリー/ドネーションウェア - Haruqaのソフトウェアとか - BOOTH) or Haruqa's Fanbox (Haruqa|pixivFANBOX).
- Decompiling, reverse engineering, and analyzing deep into the software's code/files is FORBIDDEN.
- Intentionally extracting the logistics, code, core functions, design, of any of the files and also reusing them for another software is FORBIDDEN.
- Disclosing any unintentional/private specifications of the software by the user is NOT permitted.
- Modifying the software by rewriting the code/changing the files of the core libraries, while without prior permission from the creator (Haruqa), is NOT permitted.
- Creating any type of add-ons, plugins, automatic operation tools, mods or any type of external program connected to TALQu, and then releasing them into the public is NOT permitted.
- Hacking the software is also NOT permitted.
ii) Permitted/Allowed Acts:
- Adding model files into the "Models" folder is allowed for using downloaded/created models.
- It is also allowed to add/compile/integrate the CUDA 11.0 patch into the software's files as to fix up the program for proper use.
- Just like UTAU's/Deepvocal's voicebanks, users are free to create, distribute, sell and create TOS's for voice models made for the software, but users have to be noted that specification/functions could change in each update without further notice, so it's best to update your voice models to work with the latest versions if necessary.
- Usage of Haruqa's voice model (default voice) but you have to comply with their specific TOS. Their specific TOS can be found here: Haruqaの配布サイト.
1.d Installation Guide (for the free version)
1. If you have an NVidia GPU and wanting to utilize it for synthesis, you must download and install the latest driver version, and also any of the CUDA Toolkit above version 10 (best to get the latest version). If you have any of this already, then you can move on to the next step. If you don't have an NVidia GPU however (like AMD or Intel) or if you don't want to utilize the GPU, you may skip this step and refer to the 3rd step for installation.
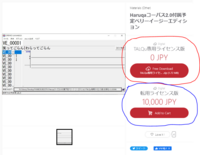
2. In case for this guide, we're just gonna get the free version of the software! Go to the official Booth page (given above). Here is an image and some info of which type of download is available:
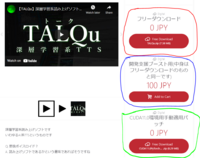
The colored poorly drawn circles (I know lol) corresponds to the type of download below:
Red circle: Download the free version without any additional things.
Blue circle: If you wanted to, you can donate about 1 dollar to Haruqa, as a boost for them while getting the free version. You will still get the free version without any changes nonetheless.
Green circle: If you have the specific version of the CUDA Toolkit 11.0 installed on your PC, you may need to download the patch to prevent some synthesis error issue after installation.
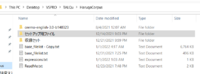
In the end, you will get "TALQu.zip", and inside will be the TALQu download manager files inside a "TALQu" folder. After downloading, extract it to any designated folder you wanted TALQu to be installed in.
3. Before installing, you have to make sure your PC was set to Japanese locale (just like how you set up UTAU). Now it's finally time to install TALQu itself! Open the "TALQu" folder, and you will find "TALQuManager" inside. Open it and run the "TALQuManager.exe" executable file (if you have the CUDA 11.0 patch, add the files into the TALQuManager folder and replace any of the files there first).
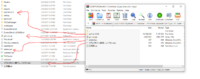
You will be greeted with this!
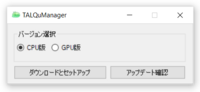
Here are all the button functions:
The two checkbox above corresponds with which version of TALQu you wanted to install. If you have an NVidia GPU and followed most of the instructions in the first step, you may select the check for "GPU版" for the GPU version. But if you don't have an NVidia GPU/don't want to utilize it, select the "CPU版" check for the CPU version (slower than the GPU version). Afterwards, you can start the installation by clicking the "ダウンロードとセットアップ" button. I will explain the function of the "アップデート確認" later in the "optional" step.
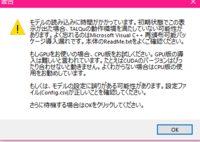
After clicking the "ダウンロードとセットアップ" button, you will be greeted with a warning prompt regarding the function of the version. If you had make sure you got the right version, press "OK". A total of about 8-10 blank CMD windows will pop up/open, and whatever you do, DO NOT CLOSE ANY OF THEM AND JUST WAIT FOR THEM TO EVENTUALLY DISAPPEAR. Finally once the CMD windows had all disappeared, there will be a window popped up saying the installation had been completed. You can close this now, go back outside of the "TALQuManager" folder, into the "TALQu" folder and you will see that TALQu has been installed!
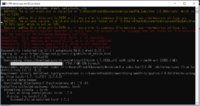
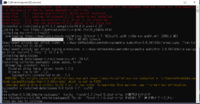
To use TALQu, you just have to open the "TALQu.exe" file and you will be greeted with a wall of text, which is basically a copy of the Terms of Service mentioned from the Booth page. As a way to confirm the text and proceed use the keyboard. For the Japanese text, press the "Shift" key. For the automatically translated English text, press the "CTRL" key. And voila! You'll get something like this image of my copy of TALQu! If it's grayed out like in the first image, you'll have to wait for under a minute as it is loading the model. If it has brightened up like the second image, you're good to go!
The grayed out loading screen:
Ready for use!:
Now you can test out if it works! Start by putting Japanese kana sentences/words into the first text box. Press the "発音を展開する" to make TALQu transliterate it into Hiragana (second box) and TALQu alphabetic phonemes (third box, only visible in PRO version). Then, you can press "再生" to generate the synthesized output! It would have a small loading bar and the output sound can be heard! The button next to it with "もう一度再生" was to replay the generated voice. The third one after the button was to save the output as a wav. I don't really know the exact function of the 4th button, but the 5th button with "wav" on it was to directly synthesize and save it as an output without listening to the output first and/or edit it with the said functions. If you were able to do an output without any errors, your TALQu has been installed properly. If you do have an error in the middle of the synthesis, please refer back to the previous steps properly and/or you might need to do the installation again...
Installing created/downloaded models:
To install a model, download it from a designated creator, they can be provided through Twitter, Booth, BowlRoll, anywhere really... After downloading, your zip should contain the voice model's folder. Once that's done, just drag and drop the folder into TALQu's "Models" folder where Haruqa's voice model and a "NWaveglowModels" folder reside. You can now reopen TALQu and select the voice! Just like how TALQu opens up, you have to wait for it to not be grayed out (loading the model) to be able to use it!
Optional step:
As I mentioned before, there was a "アップデート確認" button in TALQuManager's installation screen. Well actually just like TALQu's "アップデートをチェック" button, it's served as an automatic update check and install button. After installation you can either open TALQu or TALQuManager and click their respective buttons if there was a new update made for TALQu! (You can check on Haruqa's Twitter: https://twitter.com/niconicoHaruqa). If there is, you will be greeted with a prompt saying that a new update is available (you can check by looking to see if there is a "Cancel" button on the bottom). Press okay and wait for it to be completed! Once done, you'll be greeted with a prompt and you can just reopen TALQu again with the latest version!
Now, it's time that everybody has been waiting for... Let's make a TALQu voice model!
2. TALQu voice model creation
Let's introduce the tools first that we would be using for recording data and also the training process!
2.a. Tool 1: HaruqaCorpus
Back when TALQu was still quite new, not alot of people were making TALQu models and they would have a bit of a hard time because the only available Japanese corpuses to be used in making TALQu voice models at the time were the "JSUT" corpus and Haruqa's old "ITA-Corpus", which provided very long, hard to read sentences and very little data. But since December 24th 2021, Haruqa has released a TALQu oriented corpus known as "HaruqaCorpus2.0" (Haruqaコーパス2.0), which is essentially, a TALQu recording kit (corpuses are basically like UTAU's reclists, but is more oriented towards speech data than sampling vocals). What's great about the HaruqaCorpus is the fact that first of all, it provides OREMO reclists for you to record using OREMO (will be explained soon), and also instead of long hard to read sentences per each line, it only contains about one short word per line, and it goes up to 20,000 lines! Of course, you don't have to do all of the lines (I will explain later), but you could say it's really more than enough to make a TALQu voice model! The HaruqaCorpus also contained a base folder with all of it's essentials (including a lite version of Haruqa's HiFi gan smoothing vocoder file) to be used into TALQu after you have done training a base model! Of course there is it's own Terms of Service you have to comply to, and I'll be touching on that in the next subtopic!
2.a.1 HaruqaCorpus2.0's download
Download page: Haruqaコーパス2.0付属予定ベリーイージーエディション - Haruqaのソフトウェアとか - BOOTH
Well here I go again with the poorly drawn colored circles...
Red circle: This is for downloading the HaruqaCorpus2.0 (The Simplified TALQu Exclusive License Edition), with license RESTRICTIVELY TO BE USED IN TALQU MODEL CREATION ONLY! (will explain later in further detail in the Terms of Service section...). It's free of course. Will be using this for voice model creation in this thread!
Blue circle: This is for both getting the HaruqaCorpus2.0 and also propriety "diversion" license rights to be used with anything other than TALQu (aka using a different software, using data for something else, etc...), will also be explained further in the Terms of Service section... It's costs about 87 USD for it.
2.a.2 HaruqaCorpus' Terms of Service and Use (also properly explained in English, taken from the Booth page)
By downloading and using the HaruqaCorpus, you must comply with the following TOS:
i) Credentials when publicly releasing a voice model that uses the HaruqaCorpus for recording data:
If you did a voice model using the recorded data speaking with HaruqaCorpus' transcript and going to release it to the public, you MUST include the disclosure and credit (in both the model's distribution site and the model's README file) for the fact that your model uses recorded data spoken from the HaruqaCorpus. Please refer to "2.c.3 TALQu voice model creation after training" section for how to do the credits for both in ReadMe.txt and also the model's distribution site.
ii) Prohibited Acts:
- It is prohibited to release audio recordings using the HaruqaCorpus' transcripts publicly, however about 10 audio files or lower can be shared as audio demo samples.
- You must NEVER disclose the contents of the HaruqaCorpus' transcripts publicly.
- You must NEVER port/use the contents made using the HaruqaCorpus' (Simplified TALQu Exclusive License Edition) with anything other than TALQu model creation (aka using another software, sampling for another type of use, etc). This specific restriction is ruled out if you did however purchase the HaruqaCorpus' Edition for propriety "Diversion" license.
- Redistribution is FORBIDDEN.
iii) Permitted/Allowed Acts:
- It is allowed to create a TALQu oriented model using recorded data of transcripts from the HaruqaCorpus. Remember, ONLY FOR TALQU MODEL CREATION USE.
iv) Supplementary Details:
- For the propriety "Diversion" license, each can only be applied/allowed for one voicer/recorder/user per license. To accommodate the license to multiple people/group, said group must pay 10,000 yen (or about 87 USD) per user/recorder/voicer, each who were going to use the said license.
v) File contents:
The HaruqaCorpus includes:
- A ReadMe.txt file (which includes the Terms of Service and other notes)
- A TALQu voice model setup template folder with necessary files (As of 2nd January 2021, it also includes a lite version of Haruqa's HiFi-Gan smoothing vocoder, "HaruqaOnly_SuperLight_TALQu_HiFiGANModel_20211225.pt", which makes the voice synthesis quality of said created TALQu model much more better and improved. Currently included in as a temporary solution as it is planned to be implemented directly into a future build of TALQu. The said vocoder can be re-distributed alongside the TALQu voice model, that is until said build was released). Do not redisribute it for any other purposes than TALQu, which includes the currently included vocoder file.
- A set of OREMO transcription files (essentially HaruqaCorpus' reclist). To be used with OREMO.
2.b Tool 2: TALQu's Official base model training Colab Notebook
Training the model is a whole challenge of itself, especially when it comes down to neural network training with Tacotron 2, you REALLY need a whole lot of patience when it comes to this tool/training process as it requires a good/powerful enough NVidia GPU and also about hours to about a day or two to train. Which is why I'm quite happy and glad that Haruqa makes this process accessible to everyone by making it into an official Colab Notebook! But it's still slightly tedious to use as Google somehow likes to limit people from using their GPU after a certain time duration...
You can use the Colab notebook here, also view it's notes, TOS and also FAQ answered by Haruqa from the community who participated in the Lightning Project in original Japanese (and slightly auto translated into English at some places)!: Google Colaboratory
As the notebook may be slightly confusing as most of the texts were in Japanese (except for the auto translated ToS, which I can brief more into here), I'm here to translate them and explain further of what it says!
2.b.1 The official Colab Notebook's Terms of Service and Use (taken from the Colab notebook)
Now, this is where it gets slightly confusing to some (as it is more restrictive than the other tools mentioned), but I'll try my best to explain it properly so that everyone can understand properly. I even contacted Haruqa at one point regarding some details I'm slightly confused about, since I got my answer, I'll explain more about it in here as well! (If there is any other details missed, you may check the translated Q & A section further down!)
i) Prohibited Acts:
- You are PROHIBITED from copying/downloading the notebook and redistribute it elsewhere. In addition to that, you are ALSO PROHIBITED from downloading/extracting code, designated core files, training files (aka any .py and .txt files used for the colab) or any other element present in the notebook, and then repurposing it for another software or Colab notebook from it (so please just use the one provided and DON'T SAVE A COPY OF THE NOTEBOOK!)
- It is STRICTLY PROHIBITED to modify the notebook and disclose publicly of how to modify the notebook. If you did however modify the Colab notebook, DO NOT EVER RELEASE IT PUBLICLY WITH IT'S MODIFICATIONS AND ONLY USE IT PERSONALLY/PRIVATELY. If you trained/created a voice model or generated anything from the said modified Colab notebook, NEVER PUBLICLY DISTRIBITUTE/SHARE THE CONTENTS OF THE GENERATED ELEMENT (Voice model file, audio files, etc). You are only permitted to use said model from the modified Colab PRIVATELY/PERSONALLY. So it is highly recommended to not change/extract any code and just use the Colab Notebook as it is! This rule also applies to running Tacotron 2 locally on your PC and training it, which is NOT RECOMMENDED/NOT PERMITTED to do if you wanted to do a publicly available model, I got it from asking Haruqa about it. This would be further explained in the translated Q & A section. If you want a faster training GPU, it is recommended by Haruqa to just get either Colab Pro or Colab Pro +.
ii) Credentials when publicly releasing a voice model that was made/trained using the official TALQu voice model training Colab Notebook:
As the notebook itself uses both the HaruqaCorpus and also the FlatBaseModel (for fine-tuning, faster training with lower samples), just like with the TOS of the HaruqaCorpus, you MUST include the disclosure and credit (in both the model's distribution site and/or the model's README file) for the fact that your model uses recorded data spoken from the HaruqaCorpus and also was trained with Haruqa's FlatModelBase as the basis of training, if that is you wanted to publicly release your voice model. Please refer to "2.c.3 TALQu voice model creation after training" section for how to do the credits for both in ReadMe.txt and also the model's distribution site.
iii) Other notes about the notebook:
- Each training file and codes used contained their own Terms of Service as well. If it does show up anywhere when running the cells, please read it and comply to it (either through Haruqa's automatic translation in English, or Google translate the Japanese text yourself so you'll be able to understand it better).
- Referring to the HaruqaCorpus' TOS, the notebook uses the "Simplified TALQu Exclusive Edition" of HaruqaCorpus, which means it is completely free to use. However if you do wish to use the HaruqaCorpus text for any other purposes (other than TALQu model creation), please purchase the "Diversion" license with 10,000 yen (87 USD) per speaker/person/recorder/user.
- You must ensure that TALQu (the main software) works on your PC before creating voice your model to ensure that you are able to test run your voice model on it after training it. If it doesn't work, then it is suggested to either reinstall TALQu in a proper manner or don't make a voice model as it might require higher PC specs to run TALQu.
iv) Translated Q & A section with participants from the Lightning Project:
Haruqa has been asked by the participants during the runtime of the Lightning Project, so Haruqa made a FAQ and it would be quite helpful in TALQu model making.
Q & A
Q1. What it is recommended to do before running this Colab notebook?
A1: It is recommended to free up alot of space on your Google account's Google Drive as it might take up space creating files from this notebook. (Side note from me, HoodyP: the notebook might create multiple "checkpoint" voice model files while you train your voice, so whenever there is a new one being created and there was an older one present, please delete the previous checkpoint as it is about 300MB each. I will explain it further in the actual tutorial section.)
Q2. Do I need to have a high end PC to run the training Colab notebook?
A2: You don't have to! Google provides the usage of their own cloud GPU service when you execute/run this notebook. However, it would eventually stop due to some limited execution time. (Side note from me, HoodyP: Yeah, I did use Google Colab before and their pretty limited on their training time... Literally you have to interact with the notebook or else it would stop, and you can only run it for 12 hours max... Google's reasoning for this was to prevent people from crypto mining and also they are pretty limited on how many GPUs they have to accommodate alot of users... Sad really...)
Q3. It stopped running and I can't run the notebook again due to a "Usage Limit" error!
A3: If that's the case, you might need to wait about 24 hours before running the notebook again. It seemed like they (Google) would reduce the execution time each time you run it though... (Side note from me, HoodyP: Well, initially I was going to give a tip about using multiple accounts to go around this problem, but it seemed like Google had updated their Google Drive connection to Colab in which that you are stuck with using one Drive account per notebook execution... Since you are restricted from modifying the code of the notebook, you gotta go with what Haruqa suggested.)
Q4. Can I use the ITA-Corpus (Haruqa's previous corpus) data to train in this Colab notebook?
A4: You can't, this notebook is coded in a way that it could only train data using the Simplified TALQu Exclusive Edition of HaruqaCorpus, as to make TALQu voice model training much more easier... If you wanted to use the ITA-Corpus data and train it, it is recommended to check out the Colab notebook used here: . In the other hand, the voice actor statistics corpus (JSUT) is highly not recommended to use as it provides very hard to pronounce lines and sentences, ITA-Corpus (though not supported in this notebook) was good enough as they provided enough amount of lines/sentences to cover the entire Japanese phonetic set.
Q5. Do I have to read all 20,000 lines in the HaruqaCorpus just so I could train/create a voice model?
A5: It's really not necessary to cover the entirety of the HaruqaCorpus. To be quite frank, you can do as much as how many recordings you want! But you have to note that the training process should not be started unless there are at least 65 recorded lines.
Q6. Is it possible for me to the data recordings on a virtual machine running Windows, running on Mac?
A6: We have confirmed that it worked with the following OS environments:
MacOS: 10.13.6
Virtual machine: Parallels Desktop 15
Windows version: Windows 10 Pro 20H2, Build 19042.1415
OREMO: 3.0-b190106
Zip: the OS' standard Zip archive software/function
Q7. The OREMO comment/lines are not displaying for me...
A7: Be sure to set the saved recordings folder to one of the corresponding transcription lines' folders in the "収録セット" (in the HaruqaCorpus) folder.
Q8. There is a weird background noise when synthesizing with my voice model (after training, while testing), it seemed like that noise has been amplified...
A8: If you have any background noises in your training recordings data, it would get picked up during the training process. However if you did not have any background noises and you have set your wav files correctly, this might be due to the compatibility issue with the included lite HiFiGan smoothing vocoder. We are currently in development and experimenting with a new default vocoder for a future build of TALQu, however if you are in a hurry and wanted to get a high quality sound in time, you may use the "High Frequency General Purpose Hifi-Gan vocoder" included in TALQu PRO or create a dedicated vocoder. (Side note from me, HoodyP: About the "create a dedicated vocoder" option... As of current affairs, is best not to create your own HiFi-Gan vocoder, even if you had the knowledge of doing so... I've contacted to Haruqa about this as well and they said that because of how confusing current situations are, it's best not to do it for now, considering they are making a new vocoder for a future build... so yeah... Not recommended to do a dedicated vocoder as of now, just use the one provided in the HaruqaCorpus or TALQu PRO. It is also explained further in question 12 of this Q & A.)
Q9. Is there specific intonations/tone that I will have to do when recording the data for TALQu voice model training/creation?
A9: First of all, just to clarify, TALQu mostly tries to imitate on how you speak in those recorded wav files when training. So, I would like you to say however you want and how you wanted your voice model to sound like, you just have to read loud and clear so that the program will be able to pick up what you're saying! You can skip using intonations/tones when reading if it seemed hard to do...
Q10. It seemed like the transcriptions containing question marks and exclamation marks seemed to have been made into a jumbled mess when doing the transcription learning process...
A10: It might seemed like the characters were changed because of a ZIP compression issue coming from Windows, but I can confirm it should still work even in that state. However, if you see that the number of wav files detected were different from the amount you added in, there is something wrong going on...
Q11. Can I train this notebook locally (as in running with your own GPU)?
A11: By doing so, the Terms of Service being stated above still applies (as it is considered modifying/copying the notebook). Just as stated, you may only do so if you are in fact NOT planning to publish the voice model publicly online and is only going to use it privately.
Q12. Is there a way I could create my own custom/dedicated HiFi-GAN vocoder for my voice model?
A12: Currently, this notebook doesn't support creating a dedicated HiFi-GAN vocoder for your voice model. Also, from what I've seen, most if not all of the pretrained HiFi-GAN bases available/created online either used licensed/copyrighted material, have questionable audio licensing and only just statements stated by the creator of the voice model. So it will be quite impossible to prove to Haruqa (the creator), even if you have the knowledge of creating one and also don't use said licensed/copyrighted pretrained HiFi-GAN vocoders, as we would not like to interfere and have any inconveniences with these researchers and the original sources, in addition to also avoid unintentionally breaching their own licensing rights. Due to these current affairs, difficulties in creating the vocoder itself and also uncertain circumstances, we do not encourage, by extention, refrain you from creating a vocoder yourself without Haruqa's involvement/intervention in the process.
Q13. Where should I contact if I have issues/questions using this Colab notebook?
A13: At the moment, we do not have any prepared contact information specifically for issues/bugs/questions and others. So with all do further respect, please just contact through Haruqa's Twitter account (@niconicoHaruqa) (side note from me, HoodyP: best to message in proper Japanese and either reply to their post or @ them as Haruqa does not have a DM option in their account at the moment.). Just to clarify, when you have just started running the notebook, you would be greeted with a warning message that includes Haruqa's GMail attatched to it, but we highly encourage for you to NOT contact through the said email as it's only there for creating/handling this notebook.
Alright, that's a lot of info to take in, but... Finally it's time to create a model!
2.c. Voice model creation process!
Will be splitting this section into 2 parts, as of course there are two ways to record your wav data and the training process itself using the notebook!
2.c.1 Recording voice data (wavs)
General consensus:
So, you are going to start recording voice data to train soon. As recommended, we would be using the HaruqaCorpus as our reclist! When it comes to the amount of voice data wav files, even though the minimum requirement amount was 65 files, I would highly recommend to do at least about 1000 of these lines in the HaruqaCorpus reclist, and the more, the better! So let's go to the ways we could prepare the dataset!
i. First way: Using OREMO (recommended by Haruqa):
If you have a good and clean mic, and wanted a more precisely faster way to do it without editing the audio files, then you could just use OREMO! For the version of OREMO, it is better to use version 3.0-b + , and yes, you can use either the English version or the Japanese version, but for the sake of those who doesn't speak Japanese well, we'll be using the English version of OREMO (you can download it here: Downloading File /users/3/3800/oremo-english-3.0-b140323.zip - OSDN if you havent already)! So first on our list was to prepare for recording on OREMO. If you haven't extracted the contents of the HaruqaCorpus from it's "TALQu専用ライセンス版.zip" yet, then you should do it now! Extract the contents to a designated folder where you wanted to record in (the OREMO files folder isn't included with the HaruqaCorpus, but I did put in here cuz OREMO had issues with reading folders that had a space bar in the folder's name so... just put OREMO wherever you want and the path to OREMO/HaruqaCorpus MUST NOT HAVE ANY SPACE BARS IN THE ANY OF THE FOLDERS' NAMES OR THERE WILL BE AN ERROR.)
Now, to set up OREMO for recording, open OREMO up and do the following steps in the image below, you can check the texts for more details... (UTAForums had a weird image limit issue, so I'll put the entire tutorial images into one whole image and also added the text below it cuz I'm quite lazy to type it in a paint software lol):
View attachment tutorialoremo.png
Detailed texts for each of the steps:
Step 1. After opening OREMO, head on to "Option" and go to the "Audio I/O Settings" tab. Simple enough...
Step 2. In the "Audio I/O Settings", make sure that the PortAudio is checked for "Enable Recording", this allows you to edit the configurations below. In the configurations below it, make sure that the "Input Device" is set to "0: Microsoft Sound Mapper - Input, API=MME". In the other hand, also set the "Sampling Frequency(Hz)" to 48000, and make sure the "Quantize Bit" is set to "Int16". Click on "Apply" on the bottom and you are okay to close the settings.
Step 3. Back in the main screen, go to "Option" again, but click on the "Recording Style Settings" tab.
Step 4. In the "Recording Style Settings", make sure the very first option on the top is selected/checked (Manual recording mode by pressing "r".), once this is selected, you can close it.
Step 5. Now, to load in HarquaCorpus' transcripts into OREMO, first click on the path tab where the "Recording Folder:" lies next to.
Step 6. When browsing for a folder to load, navigate through where you placed the HaruqaCorpus' contents. From there, go into "収録セット" and pick and select any of the 5 folders. If you are gonna just start recording and wondering where to start, it's best to start with the "02500" folder (as that's where it contains the first set of transcript lines). Once you got that selected, click "OK".
Step 7. Now, go to "File" and select "Load Voice List".
Step 8. As we are gonna start with the "02500" set folder, find "02500_音名リスト.txt" in said folder and select it. (You can change it depending on which set folder you picked in step 6".
Step 9. Go to File, and then select the "Load Utterance Type List" tab.
Step 10. Finally, navigate to where the set folders lies (which is just out from which set folder you choose) and select "発音タイプリスト.txt".
Now, after you've done your set up, you can use UP and DOWN arrow keys to navigate the file/lines, while the LEFT and RIGHT keys will be used to add which suffixes at the end of the filename, you press the R key to record and press the space bar to replay the recorded audio! To make things simpler, the HaruqaCorpus also provided hiragana versions of the lines so that you guys could just read that instead as it is easier and more accurate for it's pronounciation! If you guys don't know hiragana, you guys may open the OREMO_Comment.txt file in which folder you recorded on, and just convert the hiragana text from the currently recording line, to romaji using an online romaji converter and just speak it from there! Speaking of prefixes and suffixes, let's talk about the prefixes and suffixes here! There are total of 12 filename types for each lines that can be recorded (including the normal, no suffixes in file name one), this includes the three normal one with two punctuation marks ("?" and "!") used as your standard/neutral talking, and then the other 9 file are actually optional for different set of emotions as explained in TALQu's functions ("X", "Y", "Z" variations also with punctuation marks combinations). So let me just go over and explain them in a more simpler way...
Blank (default), "?", and "!" suffixes = Used for neutral/normal/standard talking with inclusion of punctuation marks expression.
"X", "X?and "X!" suffixes = Used for any type of emotion you wanted to assign to prefix expression "X", with inclusion of combined punctuation marks expression.
"Y", "Y?and "Y!" suffixes = Used for any type of emotion you wanted to assign to prefix expression "Y", with inclusion of combined punctuation marks expression.
"Z", "Z?and "Z!" suffixes = Used for any type of emotion you wanted to assign to prefix expression "Z", with inclusion of combined punctuation marks expression.
Example: Let's say that you wanted to assign prefix "X", "Y" and "Z" as "Softly Happy", "Sad" and "Angry/Serious" expression tones respectively, and you wanted record the first "VE_00001" line. You should have the following files after recording that line with it's context/tone on how you say it in that recorded file.
"VE_00001.wav", "VE_00001?.wav" and "VE_00001!.wav" = Neutral/Normal/Standard way of how you would say the corresponding "VE_00001" line, with added tones for questioning (?) and exclaiming/overstressing (!).
"VE_00001X.wav", "VE_00001X?.wav" and "VE_00001X!.wav" = How you would say the corresponding "VE_00001" line in a very soft/happy/lightheaded tone, with added tones for questioning (?) and exclaiming/overstressing (!).
"VE_00001Y.wav", "VE_00001Y?.wav" and "VE_00001Y!.wav" = How you would say the corresponding "VE_00001" line in a sad/depressing tone, with added tones for questioning (?) and exclaiming/overstressing (!).
"VE_00001Z.wav", "VE_00001Z?.wav" and "VE_00001Z!.wav" = How you would say the corresponding "VE_00001" line in a very angry/serious tone, with added tones for questioning (?) and exclaiming/overstressing (!).
And to use said emotion in TALQu, also using the expressions examples above, you can input your lines like this: "こんにちは。Xそうだね。Y僕はアホだ!Z本当にだれ?". Which tells TALQu that, "こんにちは。" would correspond to a neutral expression of statement, "Xそうだね。" would correspond to a happy tone of statement (X), "Y僕はアホだ!" corresponding with a sad and overstressing exclamation tone (Y!) and "Z本当にだれ?" corresponds with a serious/angry questioning tone (Z?), and you can mix and match however you like depending on how you said in these recorded filenames with corresponding suffixes!
Like I said, you can just use "X", "Y" and "Z" however you like with any type of expression you would like to convey in these expression letters, just be sure to notify users who were gonna use your voice model, which letter corresponds to which expression (kind of like using varied expressive suffixes in UTAU).
Anyways, just record as how many lines you want, it will be saved automatically as .wav files when you move to the next line, and if you've done the first 2500 lines but wanted to do more on the second set, just change the voice list and recording folder which you can refer back to the step by step set up above! Now, after you've done your wav lines, you should have enough to finally train! Just hold on to the training process while I'll explain another method that you can do to record!
ii. Second way: Using Audacity (how I would record):
If you had a a bit of a weird constant static background noise while recording or you wanted to edit the audio file before saving the file, then you could just use Audacity to record and edit it! To do this, just get any Audacity version, open it, open any of the recording set folder's "OREMO-comment" .txt files (starting with 02500) and also open "発音タイプリスト.txt" (the filename suffixes file) so that you can copy and paste the filename + suffix when saving your recording as wav! To make sure it would work well with training, be sure to set your Audacity's "Project Rate (Hz)" to 48000 and save it as a 16bit wav file. In other words, the process it's similar to the one you do for OREMO, just that you have to manually copy and paste the filenames, and save, but have the ability to remove background noises (using the "Noise Reduction" effect) and/or edit on how you wanted your audio to sound like!
2.c.2 Training using the official TALQu Colab Notebook
Now, it's time to actually train it, there are more info regarding wav processing and others in the Colab notebook, but it's quite too much to add in this thread for now, so just translate using DeepL and/or Google Translate for those, as for the main process, I'll be explaining them here!
Part 1. Compiling and uploading the wav files you've made:
Once you've done your recording session and wav file saving, you are now ready to train! To start, you got to have a Google account with a dedicated Google Drive account, of course, you made it by making a Google account... simple enough lol. Any who, compile all of your wav files and create into a zip file ONLY CONTAINING YOUR WAV FILES AND DON'T PUT THEM IN SOME SORT OF A SUB-FOLDER, be sure to also name the zip file anything you like, but ONLY the Latin alphabet and numbers (A-Z, 0-9), no other weird symbols. This is to ensure that the Colab notebook was able to find your wav files, extract it and also find it again afterwards... Don't upload them into Google Drive yet, cuz we will have to run some few cells in the Colab notebook first!
Part 2. Running the cells and pre-processing with the Colab notebook:
Now, as most of you guys might not be familiar with Google Colab, let me tell you how it works. Basically, Google Colab let's you connect to their own Cloud GPUs used for neural network and you can run neural network projects with it. In the process, you will have these set of code starters called "cells" and they looked like these (these are the first two cells taken from the TALQu Colab notebook):
The play button in each cell's top left corner let's you execute the code that was set in the cell. Of course, each cell serves a different function depending on how and what type of code was added in, so basically the whole gist of the process was to run these cells in a top to bottom order. Before doing anything, to make sure that you activated the Colab notebook and also connect it to a cloud GPU, first, go to the "Runtime" tab on the top toolbar and select "Change runtime type". Select "GPU" in the "Hardware Accelerator" drop down selection and you are good to close it! Click on "Connect" on the top right and wait for it to turn the icon next to it, into a green colour and says "Connected". Now I will proceed to translate/explain the functions of each cells running in this notebook here so you will know what to do when you wanted to set up for training!
Cells:
1st. "Googleドライブのマウント(接続)を行います。左の再生アイコンをクリックしてください。"
This is the very first cell that you will have to run, just as explained, it is to connect the Colab notebook to your Google Drive. When running this cell, you will be asked by a prompt saying "Permit this notebook to access your Google Drive files?". Then you can click on the "Connect to Google Drive" button and choose your currently running the Colab notebook Google account, follow the on screen procedures and you're done. Once you've done so, just wait for a while until the loading icon of the play button stops and the prompt will say something like "mounted to /content/drive". If you got the prompt, you are ready for the next cell!
2nd. "接続したGoogleドライブに、必要なフォルダの作成を行います。左の再生アイコンをクリックしてください。"
This is where the Colab notebook will create a "TALQu" folder with also a "wavs" folder inside of it, in your Google Drive. Once executed (run) and it has stopped running, you can go to Google Drive and finally upload the zip containg your wav files into the TALQu folder's "wavs" folder. Once done, move on to the next cell.\
3rd. "接続が切れている場合は、左の再生アイコンをクリックしてGoogleドライブのマウントをやり直してください"
Though important to run, it's nothing worth noting here. This cell was just to make the Colab notebook open up/navigate into your Google Drive through the notebook, kind of like the "cd" function in your Windows' CMD terminal...
4th. "音声の前処理を実行します。下記数値を設定して、左の再生アイコンをクリックしてください。 ファイル数に比例して実行に時間がかります。 処理内容"
This cell was to extract your wav files, and then convert them into a wav file of 22050 Hz frequency. You may be wondering, "Why do Haruqa tell us to do a 48000 Hz wav file if they'll gonna convert it into a 22050 wav file???", well it's simple really. First of all, it is most likely to get the highest quality as it can to train with the current pretrained base model used, FlatBaseModel. Secondly, as explained by them, it is for in case if they release a pretrained base model which can train wav files of 48000 Hz frequency (which actually, is kind of mostly teased with Haruqa's highest quality voice model of themselves using said Hz frequency...). Since the current FlatBaseModel can only support training of 22050 Hz frequency wav files, it's best to run this cell for now... (Also, there is also an "execute_normalize" which helps to do normalization of the volume/dB of all wav files so that weird clipping issues wouldn't arise, by default it's turned off (not checked), but you can turn it on if you want to be careful and think that your audio file might be too loud for the AI to train with... Also, best not to check the "execute_RMS" box, this would do some sound levelling and sound crackling may occur.)
5th. "前処理の確定と、アップロードした収録ファイルzipを前処理済みファイルzipで置き換えを行います"
This is to trim off the silence by 0.5 seconds before you speak and after you speak in each of the audio files. This is mostly helpful if you did Haruqa's recommended OREMO method of recording. After you run this cell and it stopped successfully, you will get an "addHalfSec.zip" file in your Google Drive, move it into the aforementioned TALQu folder's "wav" folder and just leave it there. However, if you are like me and you did trim each of the audio files using an audio software (Audacity), you may skip running this cell. And also one more tip, if you wanted to resume training after you trained your voice model for the first time, just leave the zip files where it is and don't delete them as they will be used again for resuming the training process, and also don't run this cell again after that (when resuming training)!
6th. "巻き戻したい場合は下にチェックを入れて、左の再生アイコンをクリックしてください。"
This cell was to undo/rewind the process made in the previous trimming cell (Execute the code by checking "execute_rewind" and run the cell). This is to re-run the 5th cell if the results aren't desirable/an error occurred. This is also mostly helpful if you accidentally run the trimming cell and you wanted to undo. But if you feel like it's not gonna give any use for you, you may skip running this cell as well.
7th. "接続が切れている場合は、左の再生アイコンをクリックしてGoogleドライブのマウントをやり直してください"
This cell is in case if you are disconnected from Google Colab's runtime and wanted to continue the process. Just run this cell just in case...
8th. "学習を再開する場合、もしくは、↑のノート上の前処理の実行を飛ばした場合、下のチェックを入れて、左の再生アイコンをクリックしてください"
This cell is to preprocess the wavs to be suitable for training if you skipped the 5th cell and/or you wanted to resume training your model after it's initial training. This is useful for those doing the "Audacity" method so please do run it if you did the said method! To execute the cell, check the box for "executed_preprocess_of_wav" and run the cell! Do this every time you wanted to resume training. You don't have to run this cell in your voice model's first training run if you did the "OREMO" method and ran the 5th cell, but you'll have to do it as well for resuming...
9th. "必要ファイルのダウンロードと利用規約表示を行います。 左の再生アイコンをクリックしてください。"
This cell downloads the necessary training files, this includes the base_filelist.txt for converting the HaruqaCorpus' texts into TALQu alphabetic inputs, the settings for training the voice model and also the pretrained "FlatBaseModel" for shorter training time and higher quality output. They do also include TOS' for each files, so please read them and comply! (Haruqa has also auto translated them into English and it's actually easy to understand, so I don't really have to explain it here, just read it yourself :P)
10th. "テンサーボードを起動します。左の再生アイコンをクリックしてください。"
This cell starts up Tensorboard for training. Tensorboard is basically like a chart... thing... where you can check if your voice model training is doing well and correctly. When you run this cell initially, it would open up Tensorboard, but show an error as there are no data to be displayed, but, it will show some charts eventually once you've run the training processing cell for a while, or click the "Update" button (the one with the reloading looking icon). If the charts shown for "training loss" and "validation loss" seemed to look like it was curved and constantly decreasing, it means it seemed to be working great! However, if the "validation loss" seemed to be rising while "training loss" was decreasing and going down, it's best to stop the training process before it became "overfitted" (aka, your voice model can only speak with only the text present in the amount of lines you recorded in your wavs data).
Now with all of the cells now executed successfully, you can start the training process!
Part 3. TRAINING TIME!!!!:
Now, the last two cells will be your actual training code, and the other cell for recounting how many wav files you have used to train the voice model! So now without further ado, let's start training and finally making that voice model!
Start the "学習の実行をします。左の再生アイコンをクリックしてください。" cell and now all you can do is wait! First, it would count how many files that are present in the training process, then it would install all of it's dependencies and it will start training! Just a little tid bit from me, as Colab can be quite attention-seeking for user interaction, please look an eye out for a "reCaptcha" popping up in the middle of the screen randomly and work your way to verify to not being a bot, it will resume training from there! If you don't, it would disconnect after sometime so you better look an eye for it!! Anyways, train it to how long you can manage! I would say that it's best to get the validation loss as low as about 0.12 and under, and I can tell you that it might take at least an entire day just to train, so please BE VERY PATIENT! Once you got to the desired amount, you may stop the cell from running by clicking on the stop icon on the top left corner of the cell (which was taking the place of the play button).
So, it will save "checkpoint" files in a automatically created Google Drive TALQu folder's "outdir" folder, those are actually you voice model files and it would save every 1000 iterations as "checkpoint_XXXX" (Xs being the number of iterations that the model has been training for). A small useful tip from me, to conserve space in your Drive while training, once it saved as "checkpoint_2000" and if there is a "checkpoint_1000" file still in the folder, delete the previous "checkpoint_1000" file, and so on and so forth with the increasing numbers (3000, 4000, etc)...
Anyways, the very last cell in the notebook is to recount how many wav files were used for training, so, nothing big but useful if you want to give details on how many files were used I guess...
2.c.3 TALQu voice model creation after training
Now, you should have a "checkpoint_XXXX" file in the TALQu's folder "outdir" after you stopped training, now, download the file (it should have the largest iteration number in it's filename) and place it into the preset "モデル名で書き変えてください" folder found in the HaruqaCorpus' "セットアップ用ファイル" folder. For a good and a cleaner outlook on the checkpoint file, you can rename the file to include the ".pt" extension and maybe if you are dedicated enough, you can rename the "checkpoint_XXXX" into something related to your model like for example: "PonkotsuPonkatto_NTacotronModel.pt", or something like that. If you are lazy or a bit more careful, you can just leave it as it is... Now, once you've done that, you can replace/rename the "モデル名で書き変えてください" folder into whatever name you like (idk like "PonkotsuPonkatto" or "MyButt"? idk lol, just name whatever you like lol). Now you can edit the Config.csv file! Here is the translation of the Config.csv template the HaruqaCorpus provided and then an example of how you should edit it on the bottom!
Template (translated):
SpkName,【Your Speaker/Character name here】
Icon,icon.png
Author,【Your initial/nickname/credential】
URL,【URL to your official page/homepage】,【Whatever you add here will show up as the button text leading to your page】
NTacotron2Model,【the filename of the voice model file you have trained/created in the Colab notebook】
NWaveglowModel,default
HiFiGANModel,HaruqaOnly_SuperLight_TALQu_HiFiGANModel_20211225.pt
Config.csv edit Example 1:
SpkName,Ponkotsu Ponkatto (ver 1.0)
Icon,icon.png
Author,HoodyP
URL,https://twitter.com/HoodyPisDed,Go to my sad website
NTacotron2Model,PonkotsuPonkatto_NTacotronModel.pt
NWaveglowModel,default
HiFiGANModel,HaruqaOnly_SuperLight_TALQu_HiFiGANModel_20211225.pt
Config.csv edit Example 2 (if you didn't rename the checkpoint file):
SpkName,My Butt
Icon,icon.png
Author,HoodyP
URL,youtube.com/watch?v=dQw4w9WgXcQ,blegh
NTacotron2Model,checkpoint_4000
NWaveglowModel,default
HiFiGANModel,HaruqaOnly_SuperLight_TALQu_HiFiGANModel_20211225.pt
Now then, add an icon.png image that is about 100 X 100 pixels. And now for the ReadMe.txt section, you can edit the first two top parts with your model's description, but it's best to NOT edit the bottom parts that goes starting from "【表記】"... So I suggest to copy and pasting this template I made for English-speaking users, into the ReadMe.txt file so that it would be much more suitable as credentials to Haruqa's model creation tools (all needed to copy is in italic):
(*Add your model's description, details, notes, author, and terms of use here*)
【表記/Labels】
このモデルはHaruqaコーパスを使用して作成されました
This model is made with recorded data of texts taken from the HaruqaCorpus made by Haruqa.
このモデルはFlatBaseModel ( Releases · Haruqa/tacotron2 ) をベースとして作成されました
This model is also made using Haruqa's FlatBaseModel as the training base.
このモデルを使用して作成されたモデルをさらにベースとする場合も、同様に表記する義務があります
If you create/trained any voice models using this voice model as the training base, you are obliged to also add these credentials into said model.
HaruqaOnly_SuperLight_TALQu_HiFiGANModel_20211225.pt
は次期TALQu本体に組み込まれる予定のボコーダーモデルの調整中のものです。
権利者の許諾のもとに再配布しています。
Currently, HaruqaOnly_SuperLight_TALQu_HiFiGANModel_20211225.pt is used as a temporary solution as an alternative to waiting for an implementation of the vocoder itself directly into a future build of TALQu. The vocoder included here is being redistributed with the original author's permission.
Well then, you've done your model, be sure to also add the Labels credentials into your voice model's distribution site as well as other details, just to make sure and be careful so it didn't breach the TOS! So yeah... Happy TALQu-ing... I guess... (lol that was kind of cringe but yeah... Good luck yall!)
If you have any questions, feel free to reply to this thread or contact Haruqa through Twitter (but you have to write it in Japanese tho)... Well, see ya guys soon!
Hey guys, HoodyP here!
Recently, on 24th of December 2021, Haruqa (creator of TALQu) initiated the "Lightning Project Challenge" where the goal of the challenge was for people to create a TALQu model within a week. The point of the challenge, according to Haruqa, was to in fact, "reach a further audience and spark more creator's interest with TALQu content creation". In doing so, they released both the official Haruqa Corpus and the official TALQu voice model creation Colab notebook. You can check the post here (【ライトニング企画】1週間でTALQuモデル作成チャレンジできるかな【終了】|Haruqa|pixivFANBOX). Sadly enough the challenge ended by the end of 2021, but Haruqa stated in their re-tweet, responding to a person who was sad that they weren't able to finish the model in time for the challenge, that Haruqa is planning to, most likely indefinitely, make the Lightning Project's notes post (the one linked earlier) publicly even after the challenge, by extension, leaving both the corpus list and the Colab notebook public for future creators to make their own TALQu models! So this is great news! In turn, I'll be making an English guide on TALQu and how you can create a "lite" version model yourself!
First of, let's start of with the fundamentals!
1. Introduction to TALQu
1.a What is "TALQu"?
TALQu is a freemium Japanese AI text-to-speech software created by Haruqa (or by association, Haruqa Software, Haruqaのソフトウェア), an indie code writer/programmer, and also apparently a Vtuber! TALQu uses a modified variant of Tacotron 2 + HiFi-Gan (an open-source neural network based text-to-speech engine) as it's base engine, and it has both a free version and a PRO version. It has recently gotten popular in the Japanese vocal-synth community that even well known UTAU/SynthV voice creators such as Canon (Ritsu), VirVox Project (SynthV Genbu), Yuuma (Shiki Rowen, aka Kemonone Rou), Kirika (Female Ruko) and even recently, Twindrill (Kasane Teto), have all made TALQu voice models based on their established characters!
The free version of TALQu can be downloaded here:
TALQu 深層学習系読み上げソフト フリー/ドネーションウェア - Haruqaのソフトウェアとか - BOOTH
深層学習系読み上げソフトです いわゆるAI系TTSというものです TALQu公式サイト: https://haruqa.github.io/TALQu/ [PR] ここからダウンロードできる通常TALQuの上位版、「TALQuPRO」をFANBOXの支援者限定で配布しています。ひと月定額のサブスク方式 https://haruqa.fanbox.cc/ ※TALQuPROの利用ライセンス取得方法が増えました※ はるぽラボの https://discord.gg/FkQZEUVsKs ひと月定額はるぽ(はるぽサブスク)からも利用可能です。 はるぽについて
However by contributing about 4-5USD per month to Haruqa's Fanbox, Haruqa|pixivFANBOX (which is essentially like Haruqa's Patreon), you can get the latest PRO version of TALQu!
1.b Difference between the "Free" and "PRO" version of TALQu
Free version (shown in the picture above)
- Have the ability to switch between the normal Tacotron 2 synthesizer, and/or the smooth HiFi-Gan vocoder synthesizer (top left slider).
- Ability to tune and edit the tone of the voice output by drawing on it (clicking on the "調声する" button).
- Sliding up and down the pitch of the voice output ("ピッチ" slider) or the gender of the voice output ("フォルマント" slider).
- Using the other slider functions to get the desired results.
-Using capital letters "X, Y and Z" at the start of the word, and also "?" and "!" at the end of the word to do varied expressions (if the voice models has any).
- Check and automatically update TALQu to the latest version by clicking the "アップデートをチェック" button.
PRO version (Haruqa's Fanbox exclusive)
It has all of the functions of the free version, in addition with:
- Editing the input text's generated alphabetic phonemes (third input text box, similar to the phoneme edit function in SynthV).
- Have a function to use a "High Frequency General Purpose Hifi-Gan vocoder" to any of the selected models (even to the voice models that doesn't have a HiFi-Gan smoothing vocoder function).
- Ability to switch between different voice model types for a single voicer (if they had any).
1.c TALQu's Term's of Service (properly explained in English, taken from it's Booth site)
By using TALQu and it's created models, you must comply with the following TOS:
i) Prohibited Acts:
- You must not use the program for use in criminal activity, mischief (such as pranking, troll, etc), and malicious intent (such as harassment, spark political debate/ideas, spread negativity of an individual/group, etc).
- Redistribution of the software, no matter if it's the free or the PRO version, is NOT permitted. If you wanted to share TALQu's download, just link to either the official Booth website (TALQu 深層学習系読み上げソフト フリー/ドネーションウェア - Haruqaのソフトウェアとか - BOOTH) or Haruqa's Fanbox (Haruqa|pixivFANBOX).
- Decompiling, reverse engineering, and analyzing deep into the software's code/files is FORBIDDEN.
- Intentionally extracting the logistics, code, core functions, design, of any of the files and also reusing them for another software is FORBIDDEN.
- Disclosing any unintentional/private specifications of the software by the user is NOT permitted.
- Modifying the software by rewriting the code/changing the files of the core libraries, while without prior permission from the creator (Haruqa), is NOT permitted.
- Creating any type of add-ons, plugins, automatic operation tools, mods or any type of external program connected to TALQu, and then releasing them into the public is NOT permitted.
- Hacking the software is also NOT permitted.
ii) Permitted/Allowed Acts:
- Adding model files into the "Models" folder is allowed for using downloaded/created models.
- It is also allowed to add/compile/integrate the CUDA 11.0 patch into the software's files as to fix up the program for proper use.
- Just like UTAU's/Deepvocal's voicebanks, users are free to create, distribute, sell and create TOS's for voice models made for the software, but users have to be noted that specification/functions could change in each update without further notice, so it's best to update your voice models to work with the latest versions if necessary.
- Usage of Haruqa's voice model (default voice) but you have to comply with their specific TOS. Their specific TOS can be found here: Haruqaの配布サイト.
1.d Installation Guide (for the free version)
1. If you have an NVidia GPU and wanting to utilize it for synthesis, you must download and install the latest driver version, and also any of the CUDA Toolkit above version 10 (best to get the latest version). If you have any of this already, then you can move on to the next step. If you don't have an NVidia GPU however (like AMD or Intel) or if you don't want to utilize the GPU, you may skip this step and refer to the 3rd step for installation.
2. In case for this guide, we're just gonna get the free version of the software! Go to the official Booth page (given above). Here is an image and some info of which type of download is available:
The colored poorly drawn circles (I know lol) corresponds to the type of download below:
Red circle: Download the free version without any additional things.
Blue circle: If you wanted to, you can donate about 1 dollar to Haruqa, as a boost for them while getting the free version. You will still get the free version without any changes nonetheless.
Green circle: If you have the specific version of the CUDA Toolkit 11.0 installed on your PC, you may need to download the patch to prevent some synthesis error issue after installation.
In the end, you will get "TALQu.zip", and inside will be the TALQu download manager files inside a "TALQu" folder. After downloading, extract it to any designated folder you wanted TALQu to be installed in.
3. Before installing, you have to make sure your PC was set to Japanese locale (just like how you set up UTAU). Now it's finally time to install TALQu itself! Open the "TALQu" folder, and you will find "TALQuManager" inside. Open it and run the "TALQuManager.exe" executable file (if you have the CUDA 11.0 patch, add the files into the TALQuManager folder and replace any of the files there first).
You will be greeted with this!
Here are all the button functions:
The two checkbox above corresponds with which version of TALQu you wanted to install. If you have an NVidia GPU and followed most of the instructions in the first step, you may select the check for "GPU版" for the GPU version. But if you don't have an NVidia GPU/don't want to utilize it, select the "CPU版" check for the CPU version (slower than the GPU version). Afterwards, you can start the installation by clicking the "ダウンロードとセットアップ" button. I will explain the function of the "アップデート確認" later in the "optional" step.
After clicking the "ダウンロードとセットアップ" button, you will be greeted with a warning prompt regarding the function of the version. If you had make sure you got the right version, press "OK". A total of about 8-10 blank CMD windows will pop up/open, and whatever you do, DO NOT CLOSE ANY OF THEM AND JUST WAIT FOR THEM TO EVENTUALLY DISAPPEAR. Finally once the CMD windows had all disappeared, there will be a window popped up saying the installation had been completed. You can close this now, go back outside of the "TALQuManager" folder, into the "TALQu" folder and you will see that TALQu has been installed!
To use TALQu, you just have to open the "TALQu.exe" file and you will be greeted with a wall of text, which is basically a copy of the Terms of Service mentioned from the Booth page. As a way to confirm the text and proceed use the keyboard. For the Japanese text, press the "Shift" key. For the automatically translated English text, press the "CTRL" key. And voila! You'll get something like this image of my copy of TALQu! If it's grayed out like in the first image, you'll have to wait for under a minute as it is loading the model. If it has brightened up like the second image, you're good to go!
The grayed out loading screen:
Ready for use!:
Now you can test out if it works! Start by putting Japanese kana sentences/words into the first text box. Press the "発音を展開する" to make TALQu transliterate it into Hiragana (second box) and TALQu alphabetic phonemes (third box, only visible in PRO version). Then, you can press "再生" to generate the synthesized output! It would have a small loading bar and the output sound can be heard! The button next to it with "もう一度再生" was to replay the generated voice. The third one after the button was to save the output as a wav. I don't really know the exact function of the 4th button, but the 5th button with "wav" on it was to directly synthesize and save it as an output without listening to the output first and/or edit it with the said functions. If you were able to do an output without any errors, your TALQu has been installed properly. If you do have an error in the middle of the synthesis, please refer back to the previous steps properly and/or you might need to do the installation again...
Installing created/downloaded models:
To install a model, download it from a designated creator, they can be provided through Twitter, Booth, BowlRoll, anywhere really... After downloading, your zip should contain the voice model's folder. Once that's done, just drag and drop the folder into TALQu's "Models" folder where Haruqa's voice model and a "NWaveglowModels" folder reside. You can now reopen TALQu and select the voice! Just like how TALQu opens up, you have to wait for it to not be grayed out (loading the model) to be able to use it!
Optional step:
As I mentioned before, there was a "アップデート確認" button in TALQuManager's installation screen. Well actually just like TALQu's "アップデートをチェック" button, it's served as an automatic update check and install button. After installation you can either open TALQu or TALQuManager and click their respective buttons if there was a new update made for TALQu! (You can check on Haruqa's Twitter: https://twitter.com/niconicoHaruqa). If there is, you will be greeted with a prompt saying that a new update is available (you can check by looking to see if there is a "Cancel" button on the bottom). Press okay and wait for it to be completed! Once done, you'll be greeted with a prompt and you can just reopen TALQu again with the latest version!
Now, it's time that everybody has been waiting for... Let's make a TALQu voice model!
2. TALQu voice model creation
Let's introduce the tools first that we would be using for recording data and also the training process!
2.a. Tool 1: HaruqaCorpus
Back when TALQu was still quite new, not alot of people were making TALQu models and they would have a bit of a hard time because the only available Japanese corpuses to be used in making TALQu voice models at the time were the "JSUT" corpus and Haruqa's old "ITA-Corpus", which provided very long, hard to read sentences and very little data. But since December 24th 2021, Haruqa has released a TALQu oriented corpus known as "HaruqaCorpus2.0" (Haruqaコーパス2.0), which is essentially, a TALQu recording kit (corpuses are basically like UTAU's reclists, but is more oriented towards speech data than sampling vocals). What's great about the HaruqaCorpus is the fact that first of all, it provides OREMO reclists for you to record using OREMO (will be explained soon), and also instead of long hard to read sentences per each line, it only contains about one short word per line, and it goes up to 20,000 lines! Of course, you don't have to do all of the lines (I will explain later), but you could say it's really more than enough to make a TALQu voice model! The HaruqaCorpus also contained a base folder with all of it's essentials (including a lite version of Haruqa's HiFi gan smoothing vocoder file) to be used into TALQu after you have done training a base model! Of course there is it's own Terms of Service you have to comply to, and I'll be touching on that in the next subtopic!
2.a.1 HaruqaCorpus2.0's download
Download page: Haruqaコーパス2.0付属予定ベリーイージーエディション - Haruqaのソフトウェアとか - BOOTH
Well here I go again with the poorly drawn colored circles...
Red circle: This is for downloading the HaruqaCorpus2.0 (The Simplified TALQu Exclusive License Edition), with license RESTRICTIVELY TO BE USED IN TALQU MODEL CREATION ONLY! (will explain later in further detail in the Terms of Service section...). It's free of course. Will be using this for voice model creation in this thread!
Blue circle: This is for both getting the HaruqaCorpus2.0 and also propriety "diversion" license rights to be used with anything other than TALQu (aka using a different software, using data for something else, etc...), will also be explained further in the Terms of Service section... It's costs about 87 USD for it.
2.a.2 HaruqaCorpus' Terms of Service and Use (also properly explained in English, taken from the Booth page)
By downloading and using the HaruqaCorpus, you must comply with the following TOS:
i) Credentials when publicly releasing a voice model that uses the HaruqaCorpus for recording data:
If you did a voice model using the recorded data speaking with HaruqaCorpus' transcript and going to release it to the public, you MUST include the disclosure and credit (in both the model's distribution site and the model's README file) for the fact that your model uses recorded data spoken from the HaruqaCorpus. Please refer to "2.c.3 TALQu voice model creation after training" section for how to do the credits for both in ReadMe.txt and also the model's distribution site.
ii) Prohibited Acts:
- It is prohibited to release audio recordings using the HaruqaCorpus' transcripts publicly, however about 10 audio files or lower can be shared as audio demo samples.
- You must NEVER disclose the contents of the HaruqaCorpus' transcripts publicly.
- You must NEVER port/use the contents made using the HaruqaCorpus' (Simplified TALQu Exclusive License Edition) with anything other than TALQu model creation (aka using another software, sampling for another type of use, etc). This specific restriction is ruled out if you did however purchase the HaruqaCorpus' Edition for propriety "Diversion" license.
- Redistribution is FORBIDDEN.
iii) Permitted/Allowed Acts:
- It is allowed to create a TALQu oriented model using recorded data of transcripts from the HaruqaCorpus. Remember, ONLY FOR TALQU MODEL CREATION USE.
iv) Supplementary Details:
- For the propriety "Diversion" license, each can only be applied/allowed for one voicer/recorder/user per license. To accommodate the license to multiple people/group, said group must pay 10,000 yen (or about 87 USD) per user/recorder/voicer, each who were going to use the said license.
v) File contents:
The HaruqaCorpus includes:
- A ReadMe.txt file (which includes the Terms of Service and other notes)
- A TALQu voice model setup template folder with necessary files (As of 2nd January 2021, it also includes a lite version of Haruqa's HiFi-Gan smoothing vocoder, "HaruqaOnly_SuperLight_TALQu_HiFiGANModel_20211225.pt", which makes the voice synthesis quality of said created TALQu model much more better and improved. Currently included in as a temporary solution as it is planned to be implemented directly into a future build of TALQu. The said vocoder can be re-distributed alongside the TALQu voice model, that is until said build was released). Do not redisribute it for any other purposes than TALQu, which includes the currently included vocoder file.
- A set of OREMO transcription files (essentially HaruqaCorpus' reclist). To be used with OREMO.
2.b Tool 2: TALQu's Official base model training Colab Notebook
Training the model is a whole challenge of itself, especially when it comes down to neural network training with Tacotron 2, you REALLY need a whole lot of patience when it comes to this tool/training process as it requires a good/powerful enough NVidia GPU and also about hours to about a day or two to train. Which is why I'm quite happy and glad that Haruqa makes this process accessible to everyone by making it into an official Colab Notebook! But it's still slightly tedious to use as Google somehow likes to limit people from using their GPU after a certain time duration...
You can use the Colab notebook here, also view it's notes, TOS and also FAQ answered by Haruqa from the community who participated in the Lightning Project in original Japanese (and slightly auto translated into English at some places)!: Google Colaboratory
As the notebook may be slightly confusing as most of the texts were in Japanese (except for the auto translated ToS, which I can brief more into here), I'm here to translate them and explain further of what it says!
2.b.1 The official Colab Notebook's Terms of Service and Use (taken from the Colab notebook)
Now, this is where it gets slightly confusing to some (as it is more restrictive than the other tools mentioned), but I'll try my best to explain it properly so that everyone can understand properly. I even contacted Haruqa at one point regarding some details I'm slightly confused about, since I got my answer, I'll explain more about it in here as well! (If there is any other details missed, you may check the translated Q & A section further down!)
i) Prohibited Acts:
- You are PROHIBITED from copying/downloading the notebook and redistribute it elsewhere. In addition to that, you are ALSO PROHIBITED from downloading/extracting code, designated core files, training files (aka any .py and .txt files used for the colab) or any other element present in the notebook, and then repurposing it for another software or Colab notebook from it (so please just use the one provided and DON'T SAVE A COPY OF THE NOTEBOOK!)
- It is STRICTLY PROHIBITED to modify the notebook and disclose publicly of how to modify the notebook. If you did however modify the Colab notebook, DO NOT EVER RELEASE IT PUBLICLY WITH IT'S MODIFICATIONS AND ONLY USE IT PERSONALLY/PRIVATELY. If you trained/created a voice model or generated anything from the said modified Colab notebook, NEVER PUBLICLY DISTRIBITUTE/SHARE THE CONTENTS OF THE GENERATED ELEMENT (Voice model file, audio files, etc). You are only permitted to use said model from the modified Colab PRIVATELY/PERSONALLY. So it is highly recommended to not change/extract any code and just use the Colab Notebook as it is! This rule also applies to running Tacotron 2 locally on your PC and training it, which is NOT RECOMMENDED/NOT PERMITTED to do if you wanted to do a publicly available model, I got it from asking Haruqa about it. This would be further explained in the translated Q & A section. If you want a faster training GPU, it is recommended by Haruqa to just get either Colab Pro or Colab Pro +.
ii) Credentials when publicly releasing a voice model that was made/trained using the official TALQu voice model training Colab Notebook:
As the notebook itself uses both the HaruqaCorpus and also the FlatBaseModel (for fine-tuning, faster training with lower samples), just like with the TOS of the HaruqaCorpus, you MUST include the disclosure and credit (in both the model's distribution site and/or the model's README file) for the fact that your model uses recorded data spoken from the HaruqaCorpus and also was trained with Haruqa's FlatModelBase as the basis of training, if that is you wanted to publicly release your voice model. Please refer to "2.c.3 TALQu voice model creation after training" section for how to do the credits for both in ReadMe.txt and also the model's distribution site.
iii) Other notes about the notebook:
- Each training file and codes used contained their own Terms of Service as well. If it does show up anywhere when running the cells, please read it and comply to it (either through Haruqa's automatic translation in English, or Google translate the Japanese text yourself so you'll be able to understand it better).
- Referring to the HaruqaCorpus' TOS, the notebook uses the "Simplified TALQu Exclusive Edition" of HaruqaCorpus, which means it is completely free to use. However if you do wish to use the HaruqaCorpus text for any other purposes (other than TALQu model creation), please purchase the "Diversion" license with 10,000 yen (87 USD) per speaker/person/recorder/user.
- You must ensure that TALQu (the main software) works on your PC before creating voice your model to ensure that you are able to test run your voice model on it after training it. If it doesn't work, then it is suggested to either reinstall TALQu in a proper manner or don't make a voice model as it might require higher PC specs to run TALQu.
iv) Translated Q & A section with participants from the Lightning Project:
Haruqa has been asked by the participants during the runtime of the Lightning Project, so Haruqa made a FAQ and it would be quite helpful in TALQu model making.
Q & A
Q1. What it is recommended to do before running this Colab notebook?
A1: It is recommended to free up alot of space on your Google account's Google Drive as it might take up space creating files from this notebook. (Side note from me, HoodyP: the notebook might create multiple "checkpoint" voice model files while you train your voice, so whenever there is a new one being created and there was an older one present, please delete the previous checkpoint as it is about 300MB each. I will explain it further in the actual tutorial section.)
Q2. Do I need to have a high end PC to run the training Colab notebook?
A2: You don't have to! Google provides the usage of their own cloud GPU service when you execute/run this notebook. However, it would eventually stop due to some limited execution time. (Side note from me, HoodyP: Yeah, I did use Google Colab before and their pretty limited on their training time... Literally you have to interact with the notebook or else it would stop, and you can only run it for 12 hours max... Google's reasoning for this was to prevent people from crypto mining and also they are pretty limited on how many GPUs they have to accommodate alot of users... Sad really...)
Q3. It stopped running and I can't run the notebook again due to a "Usage Limit" error!
A3: If that's the case, you might need to wait about 24 hours before running the notebook again. It seemed like they (Google) would reduce the execution time each time you run it though... (Side note from me, HoodyP: Well, initially I was going to give a tip about using multiple accounts to go around this problem, but it seemed like Google had updated their Google Drive connection to Colab in which that you are stuck with using one Drive account per notebook execution... Since you are restricted from modifying the code of the notebook, you gotta go with what Haruqa suggested.)
Q4. Can I use the ITA-Corpus (Haruqa's previous corpus) data to train in this Colab notebook?
A4: You can't, this notebook is coded in a way that it could only train data using the Simplified TALQu Exclusive Edition of HaruqaCorpus, as to make TALQu voice model training much more easier... If you wanted to use the ITA-Corpus data and train it, it is recommended to check out the Colab notebook used here: . In the other hand, the voice actor statistics corpus (JSUT) is highly not recommended to use as it provides very hard to pronounce lines and sentences, ITA-Corpus (though not supported in this notebook) was good enough as they provided enough amount of lines/sentences to cover the entire Japanese phonetic set.
Q5. Do I have to read all 20,000 lines in the HaruqaCorpus just so I could train/create a voice model?
A5: It's really not necessary to cover the entirety of the HaruqaCorpus. To be quite frank, you can do as much as how many recordings you want! But you have to note that the training process should not be started unless there are at least 65 recorded lines.
Q6. Is it possible for me to the data recordings on a virtual machine running Windows, running on Mac?
A6: We have confirmed that it worked with the following OS environments:
MacOS: 10.13.6
Virtual machine: Parallels Desktop 15
Windows version: Windows 10 Pro 20H2, Build 19042.1415
OREMO: 3.0-b190106
Zip: the OS' standard Zip archive software/function
Q7. The OREMO comment/lines are not displaying for me...
A7: Be sure to set the saved recordings folder to one of the corresponding transcription lines' folders in the "収録セット" (in the HaruqaCorpus) folder.
Q8. There is a weird background noise when synthesizing with my voice model (after training, while testing), it seemed like that noise has been amplified...
A8: If you have any background noises in your training recordings data, it would get picked up during the training process. However if you did not have any background noises and you have set your wav files correctly, this might be due to the compatibility issue with the included lite HiFiGan smoothing vocoder. We are currently in development and experimenting with a new default vocoder for a future build of TALQu, however if you are in a hurry and wanted to get a high quality sound in time, you may use the "High Frequency General Purpose Hifi-Gan vocoder" included in TALQu PRO or create a dedicated vocoder. (Side note from me, HoodyP: About the "create a dedicated vocoder" option... As of current affairs, is best not to create your own HiFi-Gan vocoder, even if you had the knowledge of doing so... I've contacted to Haruqa about this as well and they said that because of how confusing current situations are, it's best not to do it for now, considering they are making a new vocoder for a future build... so yeah... Not recommended to do a dedicated vocoder as of now, just use the one provided in the HaruqaCorpus or TALQu PRO. It is also explained further in question 12 of this Q & A.)
Q9. Is there specific intonations/tone that I will have to do when recording the data for TALQu voice model training/creation?
A9: First of all, just to clarify, TALQu mostly tries to imitate on how you speak in those recorded wav files when training. So, I would like you to say however you want and how you wanted your voice model to sound like, you just have to read loud and clear so that the program will be able to pick up what you're saying! You can skip using intonations/tones when reading if it seemed hard to do...
Q10. It seemed like the transcriptions containing question marks and exclamation marks seemed to have been made into a jumbled mess when doing the transcription learning process...
A10: It might seemed like the characters were changed because of a ZIP compression issue coming from Windows, but I can confirm it should still work even in that state. However, if you see that the number of wav files detected were different from the amount you added in, there is something wrong going on...
Q11. Can I train this notebook locally (as in running with your own GPU)?
A11: By doing so, the Terms of Service being stated above still applies (as it is considered modifying/copying the notebook). Just as stated, you may only do so if you are in fact NOT planning to publish the voice model publicly online and is only going to use it privately.
Q12. Is there a way I could create my own custom/dedicated HiFi-GAN vocoder for my voice model?
A12: Currently, this notebook doesn't support creating a dedicated HiFi-GAN vocoder for your voice model. Also, from what I've seen, most if not all of the pretrained HiFi-GAN bases available/created online either used licensed/copyrighted material, have questionable audio licensing and only just statements stated by the creator of the voice model. So it will be quite impossible to prove to Haruqa (the creator), even if you have the knowledge of creating one and also don't use said licensed/copyrighted pretrained HiFi-GAN vocoders, as we would not like to interfere and have any inconveniences with these researchers and the original sources, in addition to also avoid unintentionally breaching their own licensing rights. Due to these current affairs, difficulties in creating the vocoder itself and also uncertain circumstances, we do not encourage, by extention, refrain you from creating a vocoder yourself without Haruqa's involvement/intervention in the process.
Q13. Where should I contact if I have issues/questions using this Colab notebook?
A13: At the moment, we do not have any prepared contact information specifically for issues/bugs/questions and others. So with all do further respect, please just contact through Haruqa's Twitter account (@niconicoHaruqa) (side note from me, HoodyP: best to message in proper Japanese and either reply to their post or @ them as Haruqa does not have a DM option in their account at the moment.). Just to clarify, when you have just started running the notebook, you would be greeted with a warning message that includes Haruqa's GMail attatched to it, but we highly encourage for you to NOT contact through the said email as it's only there for creating/handling this notebook.
Alright, that's a lot of info to take in, but... Finally it's time to create a model!
2.c. Voice model creation process!
Will be splitting this section into 2 parts, as of course there are two ways to record your wav data and the training process itself using the notebook!
2.c.1 Recording voice data (wavs)
General consensus:
So, you are going to start recording voice data to train soon. As recommended, we would be using the HaruqaCorpus as our reclist! When it comes to the amount of voice data wav files, even though the minimum requirement amount was 65 files, I would highly recommend to do at least about 1000 of these lines in the HaruqaCorpus reclist, and the more, the better! So let's go to the ways we could prepare the dataset!
i. First way: Using OREMO (recommended by Haruqa):
If you have a good and clean mic, and wanted a more precisely faster way to do it without editing the audio files, then you could just use OREMO! For the version of OREMO, it is better to use version 3.0-b + , and yes, you can use either the English version or the Japanese version, but for the sake of those who doesn't speak Japanese well, we'll be using the English version of OREMO (you can download it here: Downloading File /users/3/3800/oremo-english-3.0-b140323.zip - OSDN if you havent already)! So first on our list was to prepare for recording on OREMO. If you haven't extracted the contents of the HaruqaCorpus from it's "TALQu専用ライセンス版.zip" yet, then you should do it now! Extract the contents to a designated folder where you wanted to record in (the OREMO files folder isn't included with the HaruqaCorpus, but I did put in here cuz OREMO had issues with reading folders that had a space bar in the folder's name so... just put OREMO wherever you want and the path to OREMO/HaruqaCorpus MUST NOT HAVE ANY SPACE BARS IN THE ANY OF THE FOLDERS' NAMES OR THERE WILL BE AN ERROR.)
Now, to set up OREMO for recording, open OREMO up and do the following steps in the image below, you can check the texts for more details... (UTAForums had a weird image limit issue, so I'll put the entire tutorial images into one whole image and also added the text below it cuz I'm quite lazy to type it in a paint software lol):
View attachment tutorialoremo.png
Detailed texts for each of the steps:
Step 1. After opening OREMO, head on to "Option" and go to the "Audio I/O Settings" tab. Simple enough...
Step 2. In the "Audio I/O Settings", make sure that the PortAudio is checked for "Enable Recording", this allows you to edit the configurations below. In the configurations below it, make sure that the "Input Device" is set to "0: Microsoft Sound Mapper - Input, API=MME". In the other hand, also set the "Sampling Frequency(Hz)" to 48000, and make sure the "Quantize Bit" is set to "Int16". Click on "Apply" on the bottom and you are okay to close the settings.
Step 3. Back in the main screen, go to "Option" again, but click on the "Recording Style Settings" tab.
Step 4. In the "Recording Style Settings", make sure the very first option on the top is selected/checked (Manual recording mode by pressing "r".), once this is selected, you can close it.
Step 5. Now, to load in HarquaCorpus' transcripts into OREMO, first click on the path tab where the "Recording Folder:" lies next to.
Step 6. When browsing for a folder to load, navigate through where you placed the HaruqaCorpus' contents. From there, go into "収録セット" and pick and select any of the 5 folders. If you are gonna just start recording and wondering where to start, it's best to start with the "02500" folder (as that's where it contains the first set of transcript lines). Once you got that selected, click "OK".
Step 7. Now, go to "File" and select "Load Voice List".
Step 8. As we are gonna start with the "02500" set folder, find "02500_音名リスト.txt" in said folder and select it. (You can change it depending on which set folder you picked in step 6".
Step 9. Go to File, and then select the "Load Utterance Type List" tab.
Step 10. Finally, navigate to where the set folders lies (which is just out from which set folder you choose) and select "発音タイプリスト.txt".
Now, after you've done your set up, you can use UP and DOWN arrow keys to navigate the file/lines, while the LEFT and RIGHT keys will be used to add which suffixes at the end of the filename, you press the R key to record and press the space bar to replay the recorded audio! To make things simpler, the HaruqaCorpus also provided hiragana versions of the lines so that you guys could just read that instead as it is easier and more accurate for it's pronounciation! If you guys don't know hiragana, you guys may open the OREMO_Comment.txt file in which folder you recorded on, and just convert the hiragana text from the currently recording line, to romaji using an online romaji converter and just speak it from there! Speaking of prefixes and suffixes, let's talk about the prefixes and suffixes here! There are total of 12 filename types for each lines that can be recorded (including the normal, no suffixes in file name one), this includes the three normal one with two punctuation marks ("?" and "!") used as your standard/neutral talking, and then the other 9 file are actually optional for different set of emotions as explained in TALQu's functions ("X", "Y", "Z" variations also with punctuation marks combinations). So let me just go over and explain them in a more simpler way...
Blank (default), "?", and "!" suffixes = Used for neutral/normal/standard talking with inclusion of punctuation marks expression.
"X", "X?and "X!" suffixes = Used for any type of emotion you wanted to assign to prefix expression "X", with inclusion of combined punctuation marks expression.
"Y", "Y?and "Y!" suffixes = Used for any type of emotion you wanted to assign to prefix expression "Y", with inclusion of combined punctuation marks expression.
"Z", "Z?and "Z!" suffixes = Used for any type of emotion you wanted to assign to prefix expression "Z", with inclusion of combined punctuation marks expression.
Example: Let's say that you wanted to assign prefix "X", "Y" and "Z" as "Softly Happy", "Sad" and "Angry/Serious" expression tones respectively, and you wanted record the first "VE_00001" line. You should have the following files after recording that line with it's context/tone on how you say it in that recorded file.
"VE_00001.wav", "VE_00001?.wav" and "VE_00001!.wav" = Neutral/Normal/Standard way of how you would say the corresponding "VE_00001" line, with added tones for questioning (?) and exclaiming/overstressing (!).
"VE_00001X.wav", "VE_00001X?.wav" and "VE_00001X!.wav" = How you would say the corresponding "VE_00001" line in a very soft/happy/lightheaded tone, with added tones for questioning (?) and exclaiming/overstressing (!).
"VE_00001Y.wav", "VE_00001Y?.wav" and "VE_00001Y!.wav" = How you would say the corresponding "VE_00001" line in a sad/depressing tone, with added tones for questioning (?) and exclaiming/overstressing (!).
"VE_00001Z.wav", "VE_00001Z?.wav" and "VE_00001Z!.wav" = How you would say the corresponding "VE_00001" line in a very angry/serious tone, with added tones for questioning (?) and exclaiming/overstressing (!).
And to use said emotion in TALQu, also using the expressions examples above, you can input your lines like this: "こんにちは。Xそうだね。Y僕はアホだ!Z本当にだれ?". Which tells TALQu that, "こんにちは。" would correspond to a neutral expression of statement, "Xそうだね。" would correspond to a happy tone of statement (X), "Y僕はアホだ!" corresponding with a sad and overstressing exclamation tone (Y!) and "Z本当にだれ?" corresponds with a serious/angry questioning tone (Z?), and you can mix and match however you like depending on how you said in these recorded filenames with corresponding suffixes!
Like I said, you can just use "X", "Y" and "Z" however you like with any type of expression you would like to convey in these expression letters, just be sure to notify users who were gonna use your voice model, which letter corresponds to which expression (kind of like using varied expressive suffixes in UTAU).
Anyways, just record as how many lines you want, it will be saved automatically as .wav files when you move to the next line, and if you've done the first 2500 lines but wanted to do more on the second set, just change the voice list and recording folder which you can refer back to the step by step set up above! Now, after you've done your wav lines, you should have enough to finally train! Just hold on to the training process while I'll explain another method that you can do to record!
ii. Second way: Using Audacity (how I would record):
If you had a a bit of a weird constant static background noise while recording or you wanted to edit the audio file before saving the file, then you could just use Audacity to record and edit it! To do this, just get any Audacity version, open it, open any of the recording set folder's "OREMO-comment" .txt files (starting with 02500) and also open "発音タイプリスト.txt" (the filename suffixes file) so that you can copy and paste the filename + suffix when saving your recording as wav! To make sure it would work well with training, be sure to set your Audacity's "Project Rate (Hz)" to 48000 and save it as a 16bit wav file. In other words, the process it's similar to the one you do for OREMO, just that you have to manually copy and paste the filenames, and save, but have the ability to remove background noises (using the "Noise Reduction" effect) and/or edit on how you wanted your audio to sound like!
2.c.2 Training using the official TALQu Colab Notebook
Now, it's time to actually train it, there are more info regarding wav processing and others in the Colab notebook, but it's quite too much to add in this thread for now, so just translate using DeepL and/or Google Translate for those, as for the main process, I'll be explaining them here!
Part 1. Compiling and uploading the wav files you've made:
Once you've done your recording session and wav file saving, you are now ready to train! To start, you got to have a Google account with a dedicated Google Drive account, of course, you made it by making a Google account... simple enough lol. Any who, compile all of your wav files and create into a zip file ONLY CONTAINING YOUR WAV FILES AND DON'T PUT THEM IN SOME SORT OF A SUB-FOLDER, be sure to also name the zip file anything you like, but ONLY the Latin alphabet and numbers (A-Z, 0-9), no other weird symbols. This is to ensure that the Colab notebook was able to find your wav files, extract it and also find it again afterwards... Don't upload them into Google Drive yet, cuz we will have to run some few cells in the Colab notebook first!
Part 2. Running the cells and pre-processing with the Colab notebook:
Now, as most of you guys might not be familiar with Google Colab, let me tell you how it works. Basically, Google Colab let's you connect to their own Cloud GPUs used for neural network and you can run neural network projects with it. In the process, you will have these set of code starters called "cells" and they looked like these (these are the first two cells taken from the TALQu Colab notebook):
The play button in each cell's top left corner let's you execute the code that was set in the cell. Of course, each cell serves a different function depending on how and what type of code was added in, so basically the whole gist of the process was to run these cells in a top to bottom order. Before doing anything, to make sure that you activated the Colab notebook and also connect it to a cloud GPU, first, go to the "Runtime" tab on the top toolbar and select "Change runtime type". Select "GPU" in the "Hardware Accelerator" drop down selection and you are good to close it! Click on "Connect" on the top right and wait for it to turn the icon next to it, into a green colour and says "Connected". Now I will proceed to translate/explain the functions of each cells running in this notebook here so you will know what to do when you wanted to set up for training!
Cells:
1st. "Googleドライブのマウント(接続)を行います。左の再生アイコンをクリックしてください。"
This is the very first cell that you will have to run, just as explained, it is to connect the Colab notebook to your Google Drive. When running this cell, you will be asked by a prompt saying "Permit this notebook to access your Google Drive files?". Then you can click on the "Connect to Google Drive" button and choose your currently running the Colab notebook Google account, follow the on screen procedures and you're done. Once you've done so, just wait for a while until the loading icon of the play button stops and the prompt will say something like "mounted to /content/drive". If you got the prompt, you are ready for the next cell!
2nd. "接続したGoogleドライブに、必要なフォルダの作成を行います。左の再生アイコンをクリックしてください。"
This is where the Colab notebook will create a "TALQu" folder with also a "wavs" folder inside of it, in your Google Drive. Once executed (run) and it has stopped running, you can go to Google Drive and finally upload the zip containg your wav files into the TALQu folder's "wavs" folder. Once done, move on to the next cell.\
3rd. "接続が切れている場合は、左の再生アイコンをクリックしてGoogleドライブのマウントをやり直してください"
Though important to run, it's nothing worth noting here. This cell was just to make the Colab notebook open up/navigate into your Google Drive through the notebook, kind of like the "cd" function in your Windows' CMD terminal...
4th. "音声の前処理を実行します。下記数値を設定して、左の再生アイコンをクリックしてください。 ファイル数に比例して実行に時間がかります。 処理内容"
This cell was to extract your wav files, and then convert them into a wav file of 22050 Hz frequency. You may be wondering, "Why do Haruqa tell us to do a 48000 Hz wav file if they'll gonna convert it into a 22050 wav file???", well it's simple really. First of all, it is most likely to get the highest quality as it can to train with the current pretrained base model used, FlatBaseModel. Secondly, as explained by them, it is for in case if they release a pretrained base model which can train wav files of 48000 Hz frequency (which actually, is kind of mostly teased with Haruqa's highest quality voice model of themselves using said Hz frequency...). Since the current FlatBaseModel can only support training of 22050 Hz frequency wav files, it's best to run this cell for now... (Also, there is also an "execute_normalize" which helps to do normalization of the volume/dB of all wav files so that weird clipping issues wouldn't arise, by default it's turned off (not checked), but you can turn it on if you want to be careful and think that your audio file might be too loud for the AI to train with... Also, best not to check the "execute_RMS" box, this would do some sound levelling and sound crackling may occur.)
5th. "前処理の確定と、アップロードした収録ファイルzipを前処理済みファイルzipで置き換えを行います"
This is to trim off the silence by 0.5 seconds before you speak and after you speak in each of the audio files. This is mostly helpful if you did Haruqa's recommended OREMO method of recording. After you run this cell and it stopped successfully, you will get an "addHalfSec.zip" file in your Google Drive, move it into the aforementioned TALQu folder's "wav" folder and just leave it there. However, if you are like me and you did trim each of the audio files using an audio software (Audacity), you may skip running this cell. And also one more tip, if you wanted to resume training after you trained your voice model for the first time, just leave the zip files where it is and don't delete them as they will be used again for resuming the training process, and also don't run this cell again after that (when resuming training)!
6th. "巻き戻したい場合は下にチェックを入れて、左の再生アイコンをクリックしてください。"
This cell was to undo/rewind the process made in the previous trimming cell (Execute the code by checking "execute_rewind" and run the cell). This is to re-run the 5th cell if the results aren't desirable/an error occurred. This is also mostly helpful if you accidentally run the trimming cell and you wanted to undo. But if you feel like it's not gonna give any use for you, you may skip running this cell as well.
7th. "接続が切れている場合は、左の再生アイコンをクリックしてGoogleドライブのマウントをやり直してください"
This cell is in case if you are disconnected from Google Colab's runtime and wanted to continue the process. Just run this cell just in case...
8th. "学習を再開する場合、もしくは、↑のノート上の前処理の実行を飛ばした場合、下のチェックを入れて、左の再生アイコンをクリックしてください"
This cell is to preprocess the wavs to be suitable for training if you skipped the 5th cell and/or you wanted to resume training your model after it's initial training. This is useful for those doing the "Audacity" method so please do run it if you did the said method! To execute the cell, check the box for "executed_preprocess_of_wav" and run the cell! Do this every time you wanted to resume training. You don't have to run this cell in your voice model's first training run if you did the "OREMO" method and ran the 5th cell, but you'll have to do it as well for resuming...
9th. "必要ファイルのダウンロードと利用規約表示を行います。 左の再生アイコンをクリックしてください。"
This cell downloads the necessary training files, this includes the base_filelist.txt for converting the HaruqaCorpus' texts into TALQu alphabetic inputs, the settings for training the voice model and also the pretrained "FlatBaseModel" for shorter training time and higher quality output. They do also include TOS' for each files, so please read them and comply! (Haruqa has also auto translated them into English and it's actually easy to understand, so I don't really have to explain it here, just read it yourself :P)
10th. "テンサーボードを起動します。左の再生アイコンをクリックしてください。"
This cell starts up Tensorboard for training. Tensorboard is basically like a chart... thing... where you can check if your voice model training is doing well and correctly. When you run this cell initially, it would open up Tensorboard, but show an error as there are no data to be displayed, but, it will show some charts eventually once you've run the training processing cell for a while, or click the "Update" button (the one with the reloading looking icon). If the charts shown for "training loss" and "validation loss" seemed to look like it was curved and constantly decreasing, it means it seemed to be working great! However, if the "validation loss" seemed to be rising while "training loss" was decreasing and going down, it's best to stop the training process before it became "overfitted" (aka, your voice model can only speak with only the text present in the amount of lines you recorded in your wavs data).
Now with all of the cells now executed successfully, you can start the training process!
Part 3. TRAINING TIME!!!!:
Now, the last two cells will be your actual training code, and the other cell for recounting how many wav files you have used to train the voice model! So now without further ado, let's start training and finally making that voice model!
Start the "学習の実行をします。左の再生アイコンをクリックしてください。" cell and now all you can do is wait! First, it would count how many files that are present in the training process, then it would install all of it's dependencies and it will start training! Just a little tid bit from me, as Colab can be quite attention-seeking for user interaction, please look an eye out for a "reCaptcha" popping up in the middle of the screen randomly and work your way to verify to not being a bot, it will resume training from there! If you don't, it would disconnect after sometime so you better look an eye for it!! Anyways, train it to how long you can manage! I would say that it's best to get the validation loss as low as about 0.12 and under, and I can tell you that it might take at least an entire day just to train, so please BE VERY PATIENT! Once you got to the desired amount, you may stop the cell from running by clicking on the stop icon on the top left corner of the cell (which was taking the place of the play button).
So, it will save "checkpoint" files in a automatically created Google Drive TALQu folder's "outdir" folder, those are actually you voice model files and it would save every 1000 iterations as "checkpoint_XXXX" (Xs being the number of iterations that the model has been training for). A small useful tip from me, to conserve space in your Drive while training, once it saved as "checkpoint_2000" and if there is a "checkpoint_1000" file still in the folder, delete the previous "checkpoint_1000" file, and so on and so forth with the increasing numbers (3000, 4000, etc)...
Anyways, the very last cell in the notebook is to recount how many wav files were used for training, so, nothing big but useful if you want to give details on how many files were used I guess...
2.c.3 TALQu voice model creation after training
Now, you should have a "checkpoint_XXXX" file in the TALQu's folder "outdir" after you stopped training, now, download the file (it should have the largest iteration number in it's filename) and place it into the preset "モデル名で書き変えてください" folder found in the HaruqaCorpus' "セットアップ用ファイル" folder. For a good and a cleaner outlook on the checkpoint file, you can rename the file to include the ".pt" extension and maybe if you are dedicated enough, you can rename the "checkpoint_XXXX" into something related to your model like for example: "PonkotsuPonkatto_NTacotronModel.pt", or something like that. If you are lazy or a bit more careful, you can just leave it as it is... Now, once you've done that, you can replace/rename the "モデル名で書き変えてください" folder into whatever name you like (idk like "PonkotsuPonkatto" or "MyButt"? idk lol, just name whatever you like lol). Now you can edit the Config.csv file! Here is the translation of the Config.csv template the HaruqaCorpus provided and then an example of how you should edit it on the bottom!
Template (translated):
SpkName,【Your Speaker/Character name here】
Icon,icon.png
Author,【Your initial/nickname/credential】
URL,【URL to your official page/homepage】,【Whatever you add here will show up as the button text leading to your page】
NTacotron2Model,【the filename of the voice model file you have trained/created in the Colab notebook】
NWaveglowModel,default
HiFiGANModel,HaruqaOnly_SuperLight_TALQu_HiFiGANModel_20211225.pt
Config.csv edit Example 1:
SpkName,Ponkotsu Ponkatto (ver 1.0)
Icon,icon.png
Author,HoodyP
URL,https://twitter.com/HoodyPisDed,Go to my sad website
NTacotron2Model,PonkotsuPonkatto_NTacotronModel.pt
NWaveglowModel,default
HiFiGANModel,HaruqaOnly_SuperLight_TALQu_HiFiGANModel_20211225.pt
Config.csv edit Example 2 (if you didn't rename the checkpoint file):
SpkName,My Butt
Icon,icon.png
Author,HoodyP
URL,youtube.com/watch?v=dQw4w9WgXcQ,blegh
NTacotron2Model,checkpoint_4000
NWaveglowModel,default
HiFiGANModel,HaruqaOnly_SuperLight_TALQu_HiFiGANModel_20211225.pt
Now then, add an icon.png image that is about 100 X 100 pixels. And now for the ReadMe.txt section, you can edit the first two top parts with your model's description, but it's best to NOT edit the bottom parts that goes starting from "【表記】"... So I suggest to copy and pasting this template I made for English-speaking users, into the ReadMe.txt file so that it would be much more suitable as credentials to Haruqa's model creation tools (all needed to copy is in italic):
(*Add your model's description, details, notes, author, and terms of use here*)
【表記/Labels】
このモデルはHaruqaコーパスを使用して作成されました
This model is made with recorded data of texts taken from the HaruqaCorpus made by Haruqa.
このモデルはFlatBaseModel ( Releases · Haruqa/tacotron2 ) をベースとして作成されました
This model is also made using Haruqa's FlatBaseModel as the training base.
このモデルを使用して作成されたモデルをさらにベースとする場合も、同様に表記する義務があります
If you create/trained any voice models using this voice model as the training base, you are obliged to also add these credentials into said model.
HaruqaOnly_SuperLight_TALQu_HiFiGANModel_20211225.pt
は次期TALQu本体に組み込まれる予定のボコーダーモデルの調整中のものです。
権利者の許諾のもとに再配布しています。
Currently, HaruqaOnly_SuperLight_TALQu_HiFiGANModel_20211225.pt is used as a temporary solution as an alternative to waiting for an implementation of the vocoder itself directly into a future build of TALQu. The vocoder included here is being redistributed with the original author's permission.
Well then, you've done your model, be sure to also add the Labels credentials into your voice model's distribution site as well as other details, just to make sure and be careful so it didn't breach the TOS! So yeah... Happy TALQu-ing... I guess... (lol that was kind of cringe but yeah... Good luck yall!)
If you have any questions, feel free to reply to this thread or contact Haruqa through Twitter (but you have to write it in Japanese tho)... Well, see ya guys soon!