This is going to be a collection of information regarding tuning, the process of moving from a melody with inputted lyrics to your desired finished sound. This can include things like adjusting the Vocaloid parameters (GEN, CLE, BRI, DYN, VEL, etc.), swapping out phonemes, etc.
Although I have some thoughts on the subject, I'm not an expert tuner, so most of this guide will likely focus on providing links to those who have provided more in-depth knowledge on particular areas. If anyone has additional resources to add, please message me or leave a comment! I'll be sure to give you credit for the items you provide, likely either by a quote or @ mentioning you in parentheses.
General Thoughts on the Tuning Process
Guides to Tuning
Manuals
Whatever Vocaloid editor you're using may have come with some kind of documentation to help users get the most out of the software. Both Piapro Studio and Vocaloid 5 definitely do. Piapro's is included with the software as a PDF. Vocaloid 5's is built in and can be found in its menu (@uncreepy).
YouTube Channels
Vocaloid Parameters
Phoneme Replacement
While the ability to enter natural language words into the editor is a valuable, time-saving tool, sometimes you may need to adjust the phonemes your Vocaloid sings manually in order to get the pronunciation you want.
Lists of Phonemes/Notes on Various Languages
(Many of these are from Vocaloid Wiki, which has lots of in-depth language/tuning information. Reviewing it is recommended if you want a LOT more detail.)
This article on amino discusses how to tweak your phonemes to get a more "everyday-speak" kind of sound (e.g., pronouncing "have to" like "hafta").
Note Splitting
It's amazing how much of a difference in pronunciation you can get by splitting a note. By splitting a note containing multiple phonemes into multiple notes, you become able to more freely control the duration of the phonemes. By shortening/lengthening vowels, it seems like you can sometimes change how they get pronounced; similar to consonants, you can also either make them more evident or less intrusive, or bring out aspects of their sound that get glossed over if they're pronounced too quickly. Sometimes, replacing phonemes doesn't get you the sound you want, but taking explicit control of the lengths of your consonants and vowels does.
Cross-Synthesis (XSY)
This is a feature where two compatible voicebanks are combined to produce a new sound. It's available only to Vocaloid 3 and Vocaloid 4 generation voicebanks. This feature is not supported in the Vocaloid 5 editor. It does remain supported in the Vocaloid Editor for Cubase. For usage/technical details, see this article on Vocaloid Wiki.
Enhanced Voice Expression Control (E.V.E.C.)
This feature strengthens or softens the vowel (Voice Color feature) or initial consonant (Consonant Pronunciation/Extension feature) of a note. It can also be used to control the amount of breath at the end of a note (Voice Release feature). It is exclusive to Crypton vocaloids, and only Japanese voicebanks can currently use it. See this thread on VVN for a concise explanation, or this topic on Vocaloid Wiki for a very in-depth explanation with usage instructions.
Note-Bending/Portamento/Syllable-Splitting and Pitch Bending
These are two techniques for making a Vocaloid's voice "slide" from one note to another. In the former, you use dashes to connect the phonemes assigned to particular notes together. This lets you take a single syllable and stretch it over multiple notes. It can also be used to add little instances of higher/lower pitches before or after a note. In the latter technique, pitch bending, you use the Pitch Bend (PIT) and Pitch Bend Sensitivity (PBS) parameters together and literally draw the shape of the path you want the Vocaloid's voice to take in the editor. This is commonly thought to produce a more natural effect, but it's the more difficult of the two techniques.
@VegetalJuce made a great comment on Vocaloid Amino that explains this. You normally have to be logged in to Vocaloid Amino to be able to read comments, but I'm going to hope no one minds if I reproduce it here (reorganized a little to put the pictures in the right places). I believe it's based on the Vocaloid 4 editor, so there may be some minor differences from other editors here and there (@VegetalJuce).
Although I have some thoughts on the subject, I'm not an expert tuner, so most of this guide will likely focus on providing links to those who have provided more in-depth knowledge on particular areas. If anyone has additional resources to add, please message me or leave a comment! I'll be sure to give you credit for the items you provide, likely either by a quote or @ mentioning you in parentheses.
General Thoughts on the Tuning Process
When you first get into the Vocaloid interface, it looks like there are a lot of things to play with, and it's easy to feel overwhelmed at first. Below are a few thoughts on how to move on from there and approach tuning in general.
Guides to Tuning
Manuals
Whatever Vocaloid editor you're using may have come with some kind of documentation to help users get the most out of the software. Both Piapro Studio and Vocaloid 5 definitely do. Piapro's is included with the software as a PDF. Vocaloid 5's is built in and can be found in its menu (@uncreepy).
YouTube Channels
- Yamaha's official Vocaloid channel (@uncreepy)
- Lumi's channel(@uncreepy)
- For Vocaloid 4, but the theory/parameters are mostly similar.
- The subtitles provide English
- ボーカロイド公式 調教完全テクニック(@uncreepy, @Narumo Luckycarrot (Wow, I just rediscovered this thread on VVN; I had completely forgotten that Narumo Luckycarrot had re-created it here from VocaloidOtaku. Here's a link to that thread, too. I'll leave this here, though, since the list of the chapters is useful.))
- This book was originally written in Japanese by Pepperon-P, but Narumo has created English-translated versions of many of its sections. It is based on Vocaloid 3, but the principles generally still apply today. It covers a BUNCH of tuning topics, with both simpler principles and little notes on more advanced effects. I've provided a list of links to the translated sections below:
Part 1

 narumo.livejournal.com
Extra 1 (Guess this goes here?)
 narumo.livejournal.com
Part 2
 narumo.livejournal.com
Part 3
 narumo.livejournal.com
Part 4
 narumo.livejournal.com
Part 5
 narumo.livejournal.com
Part 6
 narumo.livejournal.com
Part 7
 narumo.livejournal.com
Part 8
 narumo.livejournal.com
Part 9
 narumo.livejournal.com
Part 10
 narumo.livejournal.com
Part 11
 narumo.livejournal.com
Part 12
 narumo.livejournal.com
Part 13
 narumo.livejournal.com
Part 14
 narumo.livejournal.com
Part 15
 narumo.livejournal.com
Nijihara Peperon's Vocaloid Tuning Manual (Translation, Part 1)
A new project, translating this book ( http://www.cdjapan.co.jp/product/NEOBK-1488390 ) on tuning Vocaloid 3. Since I bought Gakupo V3, I wanted to make him sound good. I decided to share whatever tidbits I learn from the book here. Disclaimers: -I skipped the very basics in Part 1 of the book…
narumo.livejournal.com
Extra 1 (Guess this goes here?)
Nijihara Peperon's Vocaloid Tuning Manual (Translation, Extra 1)
Someone asked me elsewhere for some clarification of the small tsu. Here it goes: As you may know, Japanese has two sets of syllabaries, also called kana: hiragana and katakana. Typically, hiragana is used with kanji (more complicated symbols of Chinese origin) to form sentences in Japanese.…
narumo.livejournal.com
Part 2
Nijihara Peperon's Vocaloid Tuning Manual (Translation, Part 2)
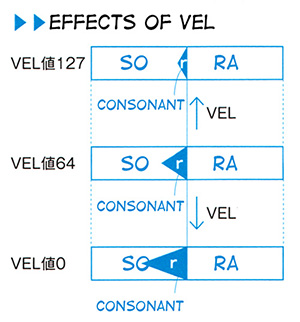
Back by popular demand! (aka, one person twitted me about it) For ...reasons, this comes before the first thing I posted. Enjoy. (Pag 28) 2.1 Velocity (VEL First Part-) The Relationship between velocity and consonants Sounds can be divided in 2 big groups: consonants and vowels. Japanese has…
narumo.livejournal.com
Part 3
Nijihara Peperon's Vocaloid Tuning Manual (Translation, Part 3)
Lets move away from VEL. I suspect this part might be a bit confusing for people that dont know Japanese, so ask away if you dont understand. You might want to contact me in DeviantArt though, since Im most active there. Or try Twitter (haha). Also, I dont know if Gakupo…
narumo.livejournal.com
Part 4
Nijihara Peperon's Vocaloid Tuning Manual (Translation, Part 4)
BRE is a short one. Again, Gakupo is not the best to demonstrate the adding energy effects. I tested the results on a female voicebank and its more noticeable. (Pag 34) 2.4 Breathiness (BRE) Breathiness is a parameter that allows changing how breathy the voice sounds. The starting…
narumo.livejournal.com
Part 5
Nijihara Peperon's Vocaloid Tuning Manual (Translation, Part 5)
More of this. Today is BRIs turn. (page 36) 2.5 Brightness (BRI) The effects of Brightness As the name indicates, with the use of BRI its possible to change the brightness of the voice. The starting value for this parameter is 64, and its range goes from 0 to 127. Back in the…
narumo.livejournal.com
Part 6
Nijihara Peperon's Vocaloid Tuning Manual (Translation, Part 6)
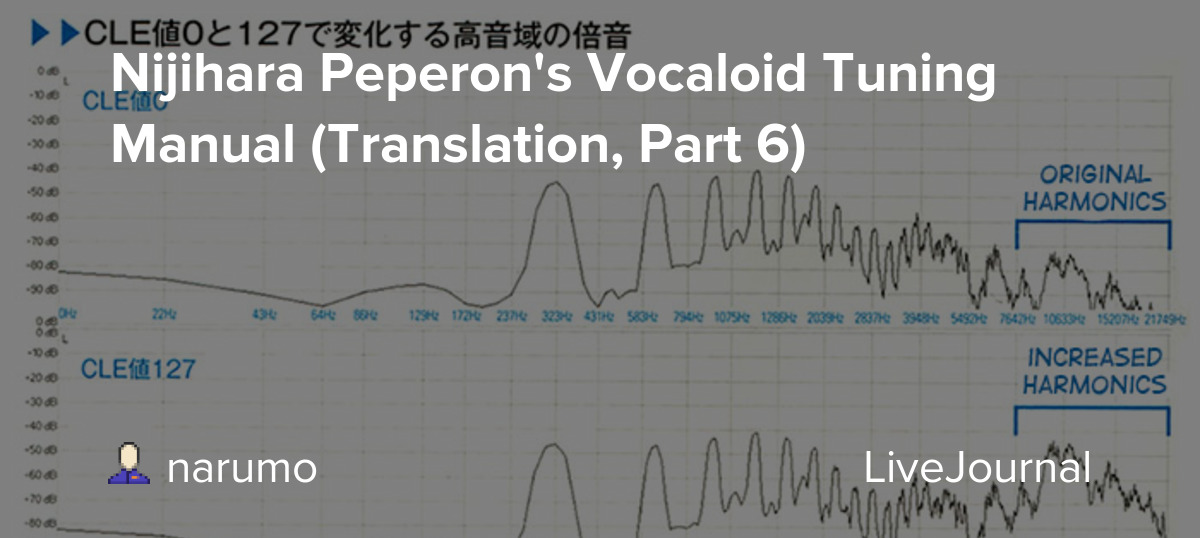
And now Clearness. Enjoy. (Pag 38) 2.6 Clearness (CLE) The effects of Clearness If you adjust the Clearness parameter (CLE) you can change the harmonics present in the high range of the voice. The starting value for this parameter is 0, and its range goes from 0 to 127. High tone harmonics are…
narumo.livejournal.com
Part 7
Nijihara Peperon's Vocaloid Tuning Manual (Translation, Part 7)
It's time for GEN: (Pag 42) 2.8 Gender Factor (GEN) The effects of Gender Factor When you use Gender Factor (GEN), its possible to change the character of the voice. The starting value for this parameter is 64, and its range goes from 0 to 127. Since it is the parameter with the most extreme…
narumo.livejournal.com
Part 8
Nijihara Peperon's Vocaloid Tuning Manual (Translation, Part 8)
A combo entry for PIT and PBS. (Page 46) 2.10 Pitch Bend (PIT) / Pitch Sensitivity (PBS) The usage of Pitch Bend By using the Pitch Bend parameter (PIT), a continuous adjustment of the interval is possible. The starting value for this parameter is 0, and its range goes from -8192 to +8191. When the…
narumo.livejournal.com
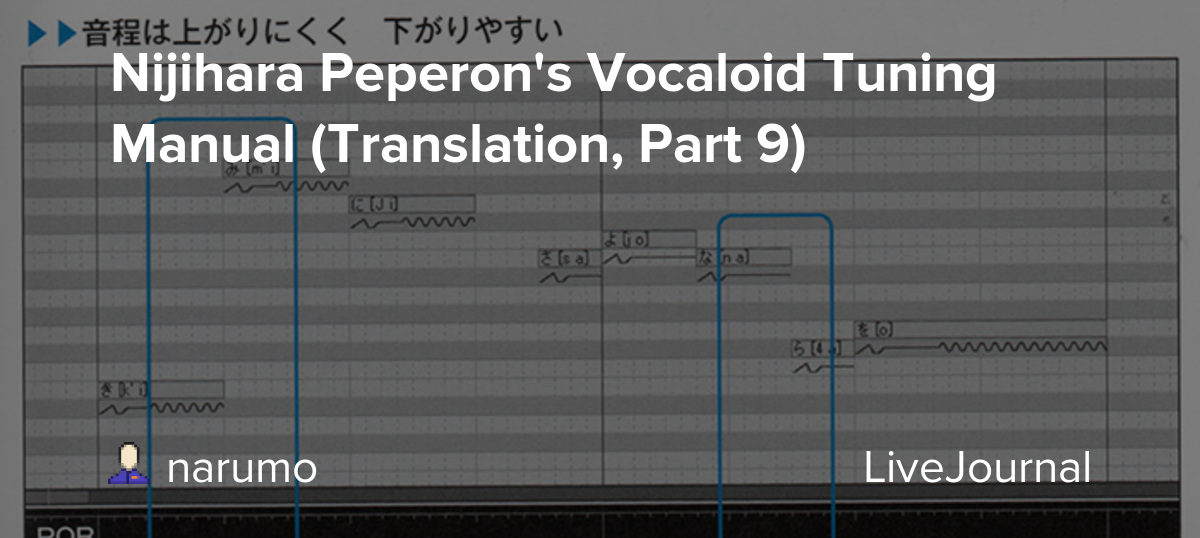
Part 9
Nijihara Peperon's Vocaloid Tuning Manual (Translation, Part 9)
Im going to post as much as I can in one go, since Im planning on ditching this for the moment, to concentrate in other translations. If anything needs clarifying, let me know. Otherwise, I might just post the text without scanning images or adding samples. Lets start with POR. (page…
narumo.livejournal.com
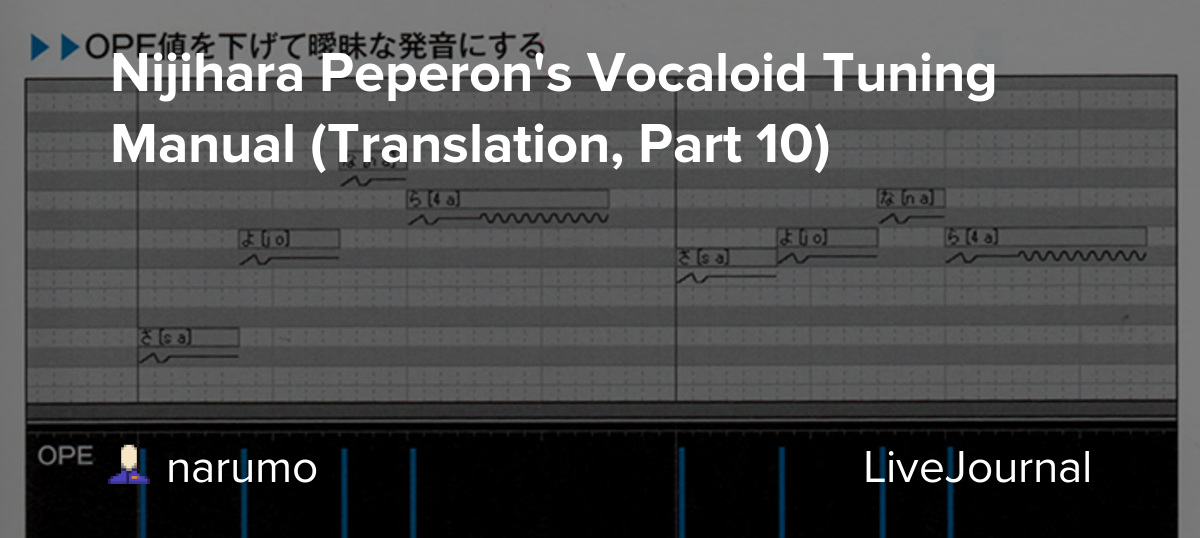
Part 10
Nijihara Peperon's Vocaloid Tuning Manual (Translation, Part 10)
Time for OPE. (Pag40) 2.7 Opening (OPE) The effects of Opening By using the parameter Opening (OPE), its possible to change how wide the performer opens their voice while singing. The starting value for this parameter is 127, and its range goes from 0 to 127. Since it is set by default to…
narumo.livejournal.com
Part 11
Nijihara Peperon's Vocaloid Tuning Manual (Translation, Part 11)
Some random pointers from chapter 3. 3.1 Changing the pronunciation (Separating the notes, Part 1) The separation of notes Among the 50 sounds used in Japanese, besides the vowels a, i, u, e and o and the consonant n, theres always a vowel and a consonant tied together in a syllable. When…
narumo.livejournal.com
Part 12
Nijihara Peperon's Vocaloid Tuning Manual (Translation, Part 12)
Shakuri...right. 3.2 Shakuri*: A technique for ascending intervals (Separating the notes, Part 2) Precise intervals and wavering intervals When you use a piano, its possible to play precise intervals quite easily, just by hitting the keys. However can the same be said of the human voice?…
narumo.livejournal.com
Part 13
Nijihara Peperon's Vocaloid Tuning Manual (Translation, Part 13)
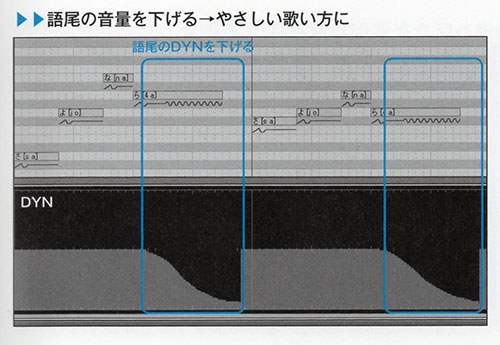
Volume control--- 3.3 Preserving volume (Separating the notes, Part 3) Holding back the decrease curve With the separation of notes, its possible to make the vocaloid sing preserving the volume. For vocaloids, when you enter a note, its volume will decrease gradually with the passage of…
narumo.livejournal.com
Part 14
Nijihara Peperon's Vocaloid Tuning Manual (Translation, Part 14)
Some pointers of using Japanese libraries for English songs (Page 72) Making the Vocaloid pronounce English There are several points in relation to the pronunciation of English using Japanese vocal libraries. The most important one is, the adjustment of consonant groups. I use this…
narumo.livejournal.com
Part 15
Nijihara Peperon's Vocaloid Tuning Manual (Translation, Part 15)
Lively singing... (Page 58) 3.5 Brisk Singing Producing a strong singing style with rising accents In sheet music, when Accent || or Tenuto |-| appear, the note (syllable) is stressed. In the case of Vocaloids, its also possible to obtain lively singing by giving those notes some nice…
narumo.livejournal.com
- VOCALOID4 Editorでボーカロイドを思い通りに歌わせる本 付属ムービーで操作方法が一目瞭然! (DVD-ROM付) (@uncreepy)
- クリプトン・フューチャー・メディア公認 初音ミク V4X 徹底攻略ガイドブック 調声からDAWでの曲作りまでわかる本 (データ・ダウンロード対応) (@uncreepy)
Vocaloid Parameters
Phoneme Replacement
While the ability to enter natural language words into the editor is a valuable, time-saving tool, sometimes you may need to adjust the phonemes your Vocaloid sings manually in order to get the pronunciation you want.
Lists of Phonemes/Notes on Various Languages
(Many of these are from Vocaloid Wiki, which has lots of in-depth language/tuning information. Reviewing it is recommended if you want a LOT more detail.)
- Chinese
- English
- Japanese
- Korean
- Spanish
- X-Sampa Phoneme Lists resource by @Infoholic--includes a variety of languages (@Infoholic)
- Other Miscellaneous Phonemes (breaths, silence, rolled "r," glottal stop, devoicing, etc.)
This article on amino discusses how to tweak your phonemes to get a more "everyday-speak" kind of sound (e.g., pronouncing "have to" like "hafta").
Note Splitting
It's amazing how much of a difference in pronunciation you can get by splitting a note. By splitting a note containing multiple phonemes into multiple notes, you become able to more freely control the duration of the phonemes. By shortening/lengthening vowels, it seems like you can sometimes change how they get pronounced; similar to consonants, you can also either make them more evident or less intrusive, or bring out aspects of their sound that get glossed over if they're pronounced too quickly. Sometimes, replacing phonemes doesn't get you the sound you want, but taking explicit control of the lengths of your consonants and vowels does.
Cross-Synthesis (XSY)
This is a feature where two compatible voicebanks are combined to produce a new sound. It's available only to Vocaloid 3 and Vocaloid 4 generation voicebanks. This feature is not supported in the Vocaloid 5 editor. It does remain supported in the Vocaloid Editor for Cubase. For usage/technical details, see this article on Vocaloid Wiki.
Enhanced Voice Expression Control (E.V.E.C.)
This feature strengthens or softens the vowel (Voice Color feature) or initial consonant (Consonant Pronunciation/Extension feature) of a note. It can also be used to control the amount of breath at the end of a note (Voice Release feature). It is exclusive to Crypton vocaloids, and only Japanese voicebanks can currently use it. See this thread on VVN for a concise explanation, or this topic on Vocaloid Wiki for a very in-depth explanation with usage instructions.
Note-Bending/Portamento/Syllable-Splitting and Pitch Bending
These are two techniques for making a Vocaloid's voice "slide" from one note to another. In the former, you use dashes to connect the phonemes assigned to particular notes together. This lets you take a single syllable and stretch it over multiple notes. It can also be used to add little instances of higher/lower pitches before or after a note. In the latter technique, pitch bending, you use the Pitch Bend (PIT) and Pitch Bend Sensitivity (PBS) parameters together and literally draw the shape of the path you want the Vocaloid's voice to take in the editor. This is commonly thought to produce a more natural effect, but it's the more difficult of the two techniques.
@VegetalJuce made a great comment on Vocaloid Amino that explains this. You normally have to be logged in to Vocaloid Amino to be able to read comments, but I'm going to hope no one minds if I reproduce it here (reorganized a little to put the pictures in the right places). I believe it's based on the Vocaloid 4 editor, so there may be some minor differences from other editors here and there (@VegetalJuce).
Pitch bend! Yes, I use it all the time. This might get very long so prepare yourself lol:
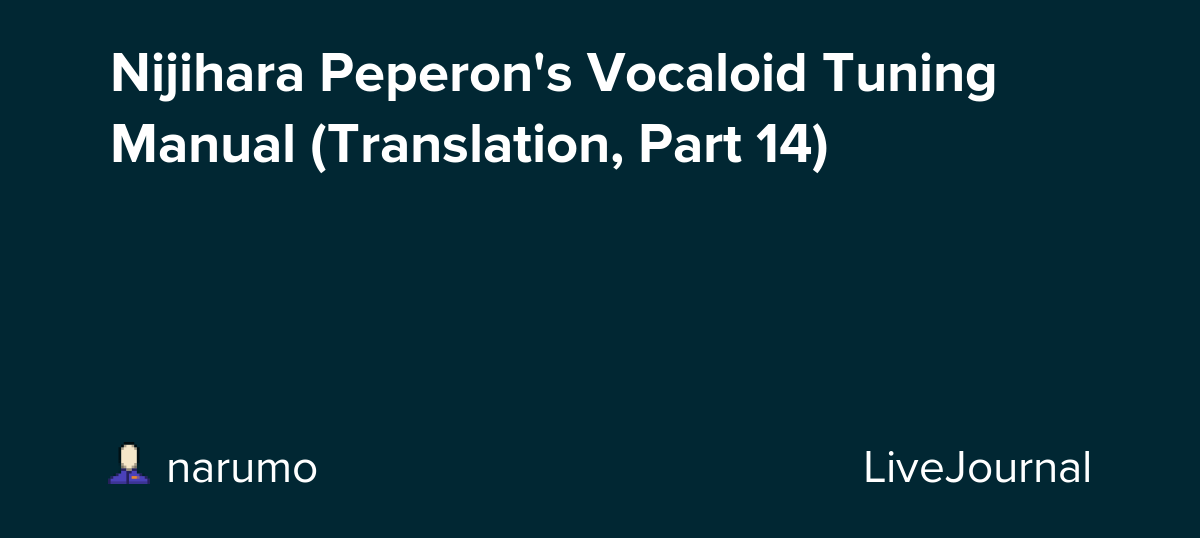
First off there are 2 ways to "bend" the pitch. The most common one is called "note bending". This is when, for example, you might see people place a short note before or after a word, above or below it. The purpose of this is to make the voice start/end at a higher/lower pitch than the majority of the word. (SEE PIC #1)
You see this a lot in the form of a short higher note after a word, to do a cutesy upwards bend. To do this type of pitch bending, you have to use a dash (portamento) on a connecting note to carry the phoneme you originally added through all the rest of the notes.
PROS:
Most people prefer this method because it is easy to see "where" the voice is going, because you are actually placing a short note at the desired pitch. It gives more "control".
CONS:
Can sometimes negatively affect pronunciation, and it's easy to accidentally throw off the timing of the syllables when you're adding all these extra notes.
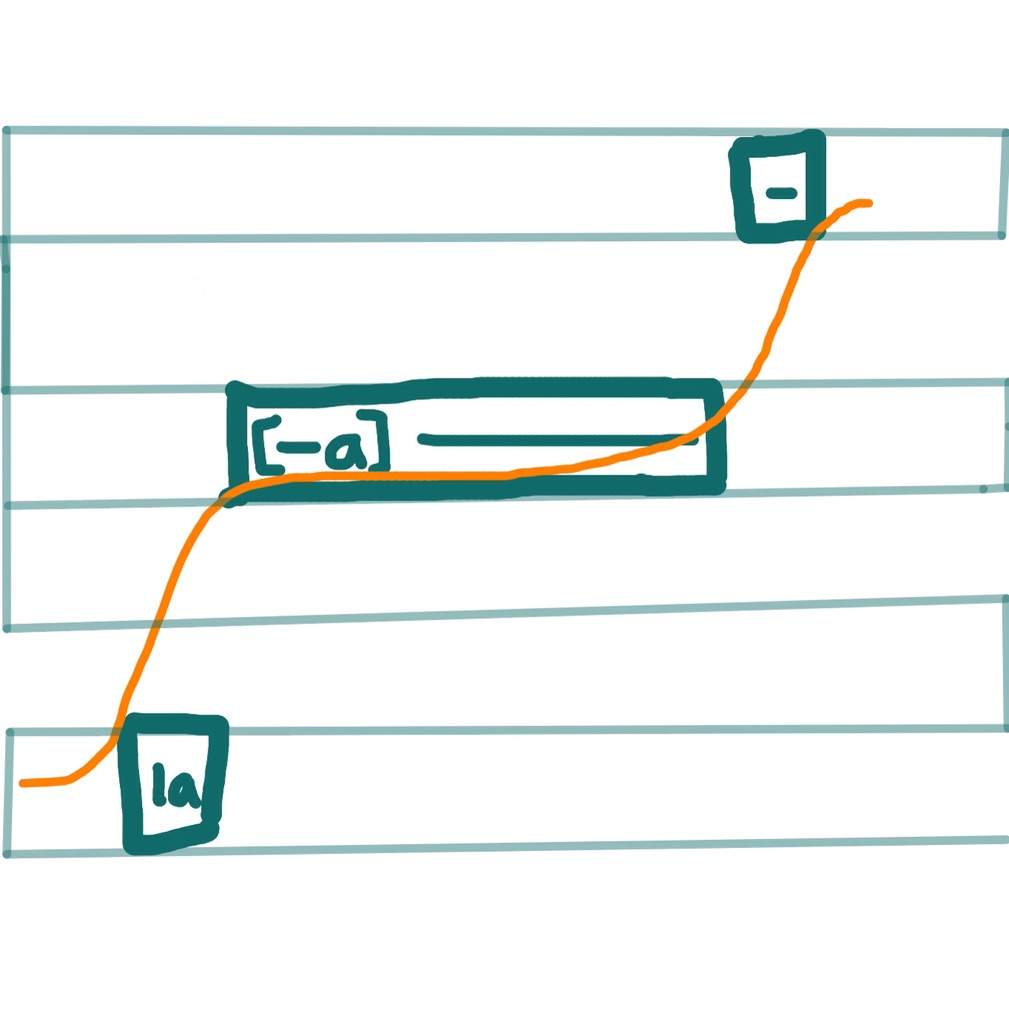
The second method is by using the PIT and PBS parameters. I'll go right out and say that this is my preferred method. This is a little harder to get the hang of, but I feel it lets you be more precise, creative, and detailed. To use this method, you first need to understand how the parameters work. PBS stands for "pitch bend sensitivity" and the default setting is 2. PBS controls how much the PIT parameter affects the voice. If PBS= 2, when you draw all the way to the top/bottom in the PIT, the voice will shift up/down two bars, to the next bar of the same color. If you set PBS to 4, drawing all the way to the top/bottom in PIT will make the voice go up 4 bars, or to the second bar of the same color, and so on. (SEE PIC #2)
PROS:
Allows you to have more variety and detail with how the voice bends around notes, helpful for slow & long transitions, will never mess up pronunciation or timing.
CONS:
Takes some practice to get the hang of, requires a little more concentration to do. Involves 2 parameters, which can be hard at first.
Now let me give you some tips I learned the hard way:
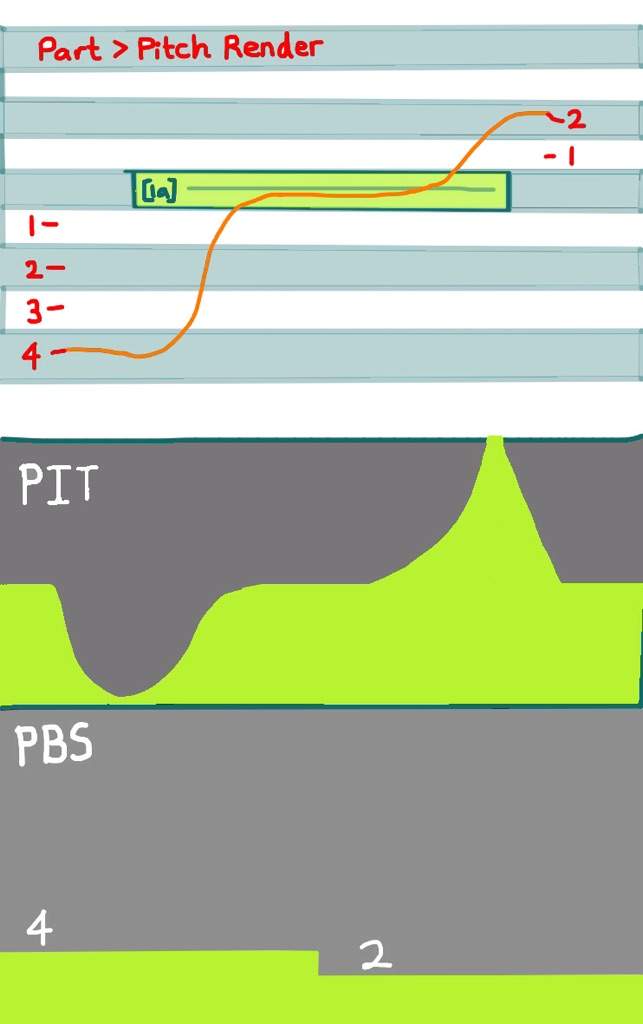
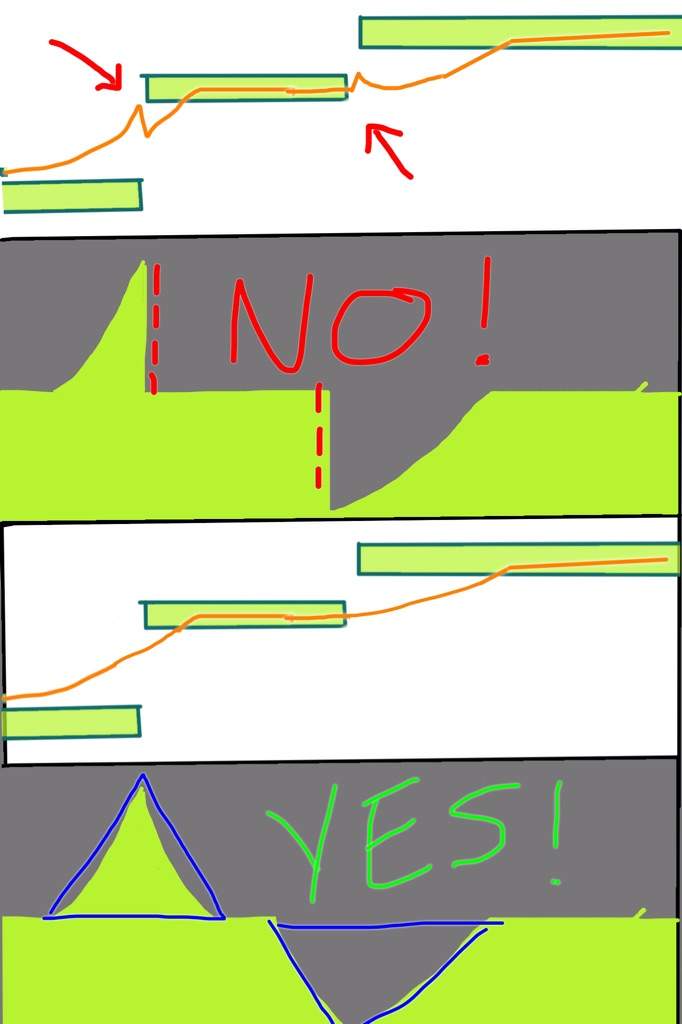
1. DON'T USE THEM BOTH TOGETHER(on top of each other)!!! It screws things up because they effect each other. This isnt to say you can't use them both at different points in a song, because you definitely SHOULD! Both types are better at certain things and you should utilize both when needed, just not right on top of each other.
2. When using PIT, you need to keep in mind that the program automatically compensated for natural pitchbend between notes and you will need to counteract that at times. To do this, you often need to draw "triangles", not just parts that have one flat side, like THIS: (SEE PIC #3)
3. Use pitch render to visually see the bends. You can find this under the "part" menu.
Soooooo.... that's all I can think of. I'm no pro, I'm actually kind of a n00b, sorry if this isn't super helpful. I know I have a lot to learn myself.
